简介
小叶支撑_形状_。通过提供包含边界数据的GeoJSON文件,可以在地图上指示县、州和国家。
<$>[备注] 注意: 这是关于使用角度和传单的四部分系列的第四部分。 <$>
在本教程中,您将学习如何为美国大陆各州渲染形状。
前提条件
要完成本教程,您需要:
- 本教程直接基于以前的parts.]中的安装和步骤
第一步-下载GeoJSON数据
本教程将为美利坚合众国各州的轮廓绘制GeoJSON数据。
访问Eric Celeste's GeoJSON and KML data for the United States并下载5 m GeoJSON文件(gz_2010_us_040_00_5m.json)。
将该文件保存在您的/sets/data目录中。
第二步-创建Shape服务
在这一点上,您应该在一个角度应用程序中拥有了LEAFLE的工作实现。
使用您的终端窗口导航到项目目录。然后,运行以下命令以生成新服务:
1npx @angular/cli generate service shape --skip-tests
这将创建一个新文件:shape.service.ts。
接下来,将这个新服务作为提供者添加到您的app.mode.ts中。
在代码编辑器中打开app.mode.ts并进行以下更改:
 1[label src/app/app.module.ts]
 2import { NgModule } from '@angular/core';
 3import { BrowserModule } from '@angular/platform-browser';
 4
 5import { HttpClientModule } from '@angular/common/http';
 6import { MarkerService } from './marker.service';
 7import { PopupService } from './popup.service';
 8import { ShapeService } from './shape.service';
 9
10import { AppComponent } from './app.component';
11import { MapComponent } from './map/map.component';
12
13@NgModule({
14  declarations: [
15    AppComponent,
16    MapComponent
17  ],
18  imports: [
19    BrowserModule,
20    HttpClientModule
21  ],
22  providers: [
23    MarkerService,
24    PopupService,
25    ShapeService
26  ],
27  bootstrap: [AppComponent]
28})
29export class AppModule { }
您的应用程序现在支持新的ShapeService。
第三步-加载形状
接下来,在代码编辑器中打开新创建的shape.service.ts,并将HttpClient添加到构造函数中:
 1[label src/app/shape.service.ts]
 2import { Injectable } from '@angular/core';
 3import { HttpClient } from '@angular/common/http';
 4
 5@Injectable({
 6  providedIn: 'root'
 7})
 8export class ShapeService {
 9  constructor(private http: HttpClient) { }
10
11  getStateShapes() {
12    return this.http.get('/assets/data/gz_2010_us_040_00_5m.json');
13  }
14}
函数getStateShape()将返回序列化的GeoJSON对象的可观测对象。要使用它,您需要订阅您的MapComponent中的可观测对象。
 1[label src/app/map/map.component.ts]
 2import { Component, AfterViewInit } from '@angular/core';
 3import * as L from 'leaflet';
 4import { MarkerService } from '../marker.service';
 5import { ShapeService } from '../shape.service';
 6
 7// ...
 8
 9@Component({
10  selector: 'app-map',
11  templateUrl: './map.component.html',
12  styleUrls: ['./map.component.css']
13})
14export class MapComponent implements AfterViewInit {
15  private map;
16  private states;
17
18  constructor(
19    private markerService: MarkerService,
20    private shapeService: ShapeService
21  ) { }
22
23  // ...
24
25  ngAfterViewInit(): void {
26    this.initMap();
27    this.markerService.makeCapitalCircleMarkers(this.map);
28    this.shapeService.getStateShapes().subscribe(states => {
29      this.states = states;
30    });
31  }
32}
这段代码将ShapeService注入构造函数,创建一个局部变量来存储数据,并调用getStateShape()函数来拉取数据并订阅结果。
<$>[备注] 注意: 更好的方法是将数据预加载到解析器中。 <$>
加载数据后,您需要将形状作为层添加到地图中。LEAFLE提供了一个专门用于GeoJSON层的工厂,您可以利用它。让我们将这个逻辑放在它自己的函数中,然后在数据解析后调用它。
 1[label src/app/map/map.component.ts]
 2// ...
 3
 4@Component({
 5  selector: 'app-map',
 6  templateUrl: './map.component.html',
 7  styleUrls: ['./map.component.css']
 8})
 9export class MapComponent implements AfterViewInit {
10  private map;
11  private states;
12
13  // ...
14
15  private initStatesLayer() {
16    const stateLayer = L.geoJSON(this.states, {
17      style: (feature) => ({
18        weight: 3,
19        opacity: 0.5,
20        color: '#008f68',
21        fillOpacity: 0.8,
22        fillColor: '#6DB65B'
23      })
24    });
25
26    this.map.addLayer(stateLayer);
27  }
28
29  ngAfterViewInit(): void {
30    this.initMap();
31    this.markerService.makeCapitalCircleMarkers(this.map);
32    this.shapeService.getStateShapes().subscribe(states => {
33      this.states = states;
34      this.initStatesLayer();
35    });
36  }
37}
函数的作用是:创建一个新的GeoJSON层,并将其添加到地图中。
保存您的更改。然后,停止您的应用程序并重新启动它。在您的Web浏览器(本地主机:4200)中打开应用程序,并观察状态的边框:
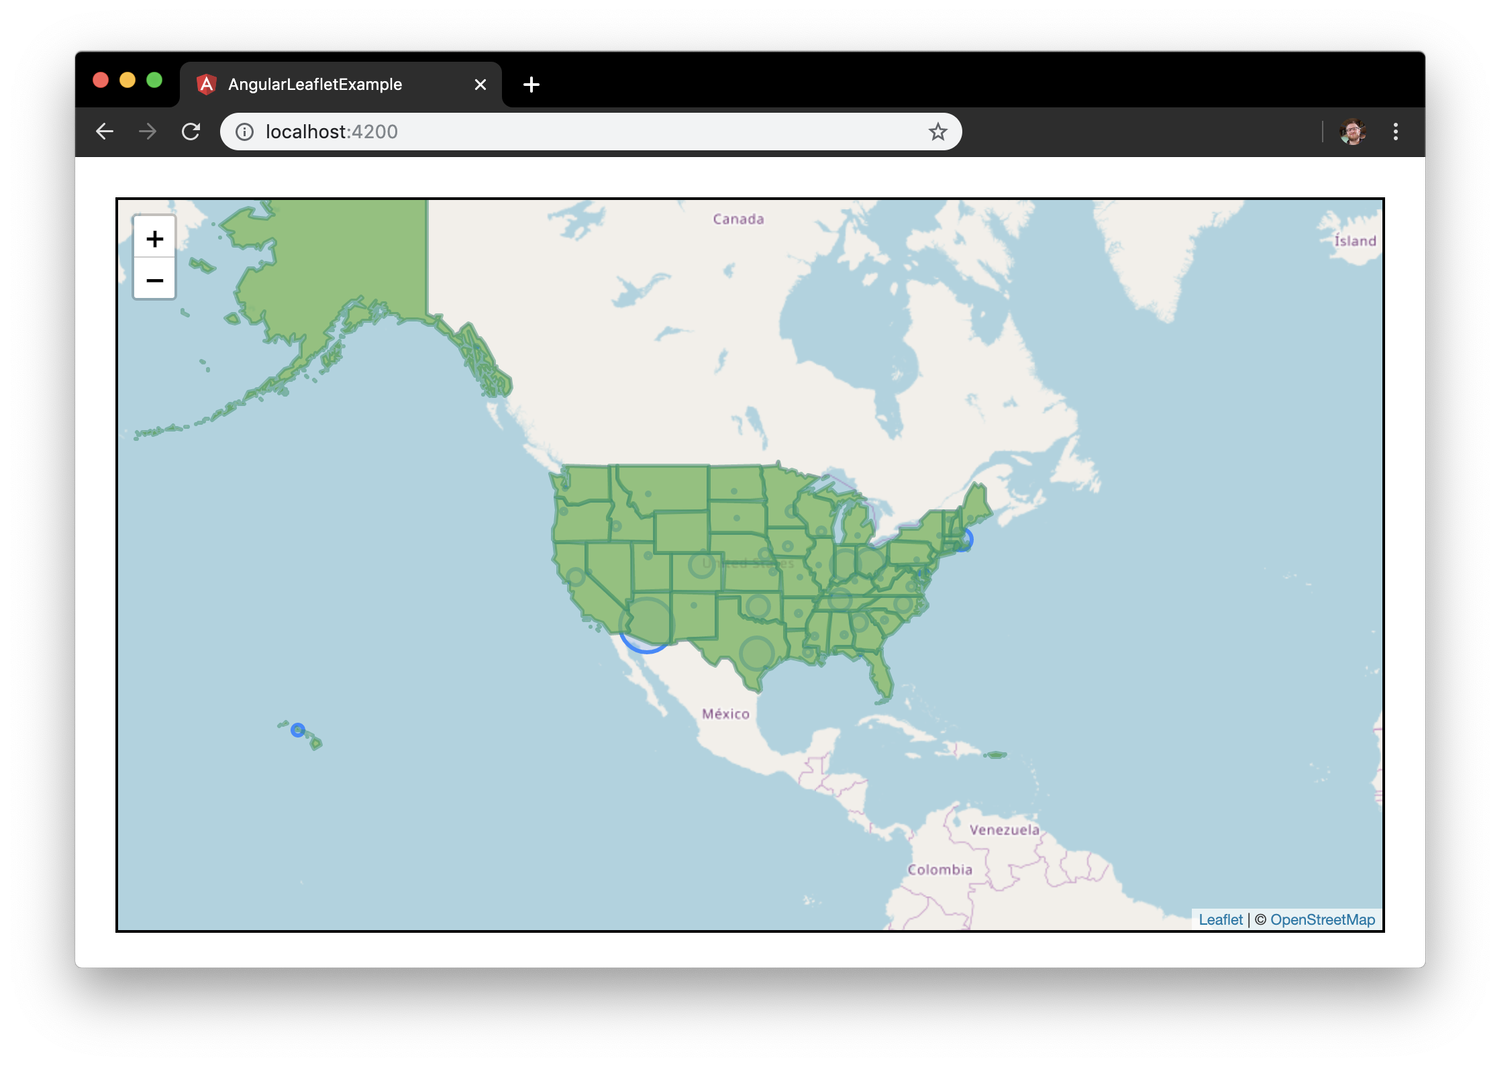 形状的地图屏幕截图
接下来,您将使用onEachFeature附加Mouseover和Mouseout事件来与每个Shape进行交互:
 1[label src/app/map/map.component.ts]
 2private highlightFeature(e) {
 3  const layer = e.target;
 4
 5  layer.setStyle({
 6    weight: 10,
 7    opacity: 1.0,
 8    color: '#DFA612',
 9    fillOpacity: 1.0,
10    fillColor: '#FAE042'
11  });
12}
13
14private resetFeature(e) {
15  const layer = e.target;
16
17  layer.setStyle({
18    weight: 3,
19    opacity: 0.5,
20    color: '#008f68',
21    fillOpacity: 0.8,
22    fillColor: '#6DB65B'
23  });
24}
25
26private initStatesLayer() {
27  const stateLayer = L.geoJSON(this.states, {
28    style: (feature) => ({
29      weight: 3,
30      opacity: 0.5,
31      color: '#008f68',
32      fillOpacity: 0.8,
33      fillColor: '#6DB65B'
34    }),
35    onEachFeature: (feature, layer) => (
36      layer.on({
37        mouseover: (e) => (this.highlightFeature(e)),
38        mouseout: (e) => (this.resetFeature(e)),
39      })
40    )
41  });
42
43  this.map.addLayer(stateLayer);
44}
保存更改。然后,在Web浏览器(localhost:4200)中打开应用程序,并将鼠标移动到形状上:
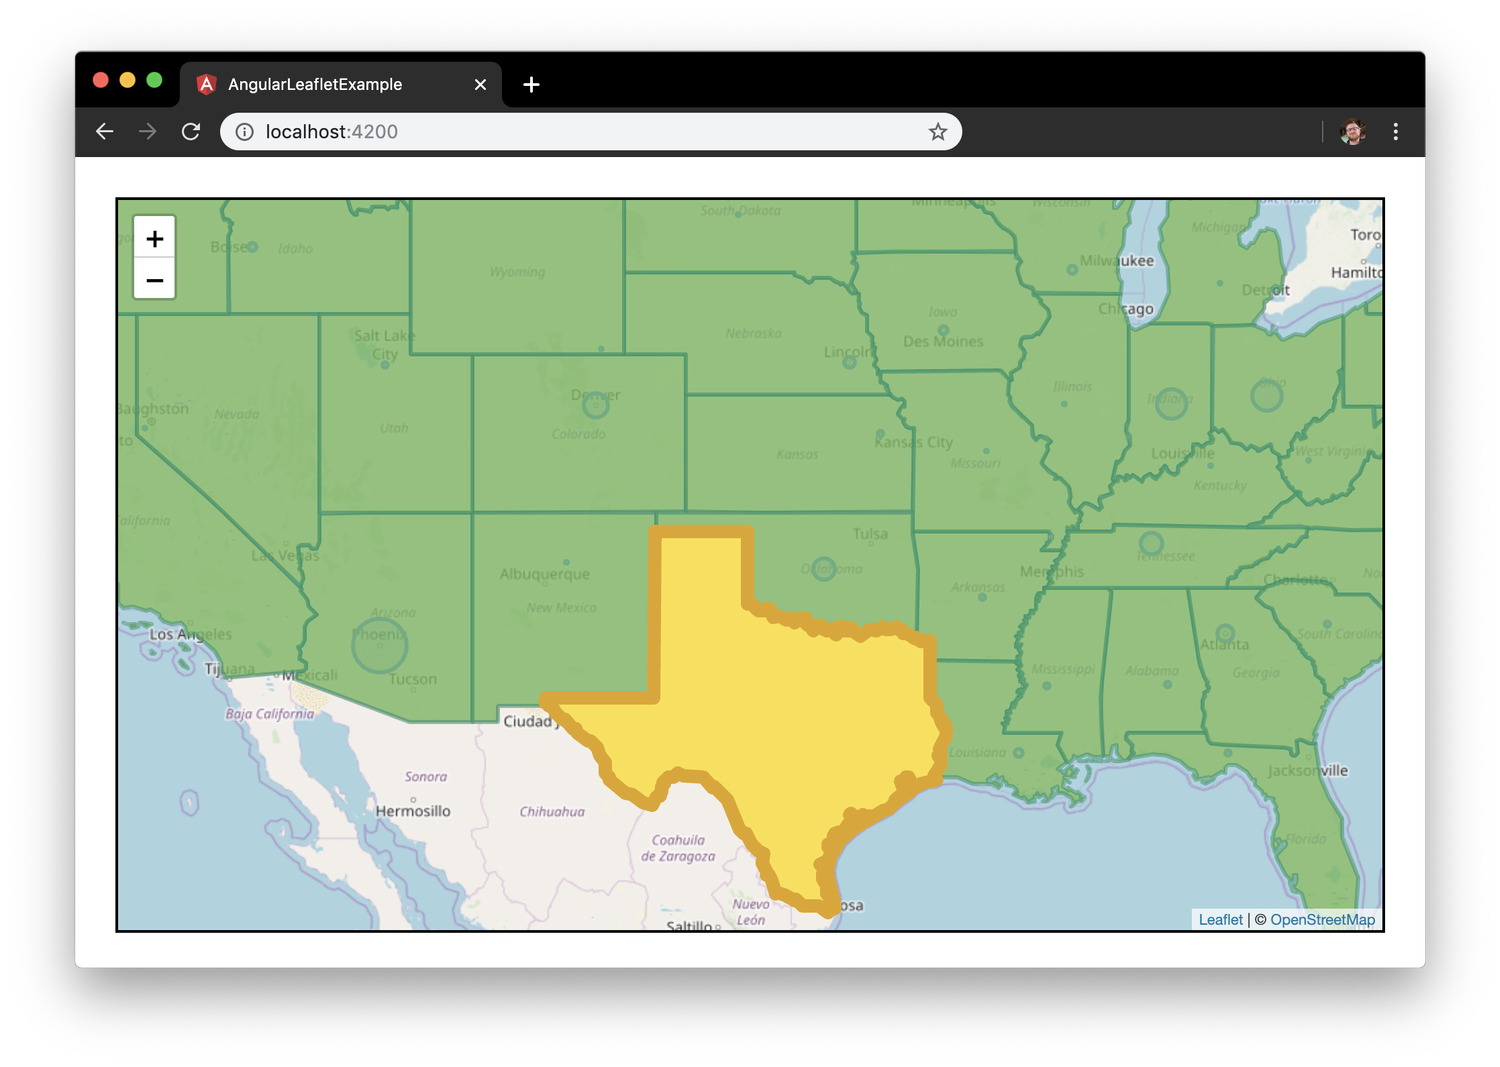 形状的地图屏幕截图
但是,由于Shape层位于标记层上方,因此标记看起来较暗。
有两种方法可以解决这个问题。第一种方法是将makeCapitalCircleMarkers()调用直接移到initStatesLayer()之后。第二种方法是在形状层被添加到地图后,在形状层上调用bringToBack()。
下面是使用bringToBack()方法的完整的map.Component.ts文件:
1[label src/app/map/map.component.ts]
2import { Component, AfterViewInit } from '@angular/core';
3import * as L from 'leaflet';
4import { MarkerService } from '../marker.service';
5import { ShapeService } from '../shape.service';
6
7const iconRetinaUrl = 'assets/marker-icon-2x.png';
8const iconUrl = 'assets/marker-icon.png';
9const shadowUrl = 'assets/marker-shadow.png';
10const iconDefault = L.icon({
11 iconRetinaUrl,
12 iconUrl,
13 shadowUrl,
14 iconSize: [25, 41],
15 iconAnchor: [12, 41],
16 popupAnchor: [1, -34],
17 tooltipAnchor: [16, -28],
18 shadowSize: [41, 41]
19});
20L.Marker.prototype.options.icon = iconDefault;
21
22@Component({
23 selector: 'app-map',
24 templateUrl: './map.component.html',
25 styleUrls: ['./map.component.css']
26})
27export class MapComponent implements AfterViewInit {
28 private map;
29 private states;
30
31 constructor(
32 private markerService: MarkerService,
33 private shapeService: ShapeService
34 ) { }
35
36 private initMap(): void {
37 this.map = L.map('map', {
38 center: [ 39.8282, -98.5795 ],
39 zoom: 3
40 });
41
42 const tiles = L.tileLayer('https://{s}.tile.openstreetmap.org/{z}/{x}/{y}.png', {
43 maxZoom: 18,
44 minZoom: 3,
45 attribution: '© <a href="http://www.openstreetmap.org/copyright">OpenStreetMap</a>'
46 });
47
48 tiles.addTo(this.map);
49 }
50
51 private highlightFeature(e) {
52 const layer = e.target;
53
54 layer.setStyle({
55 weight: 10,
56 opacity: 1.0,
57 color: '#DFA612',
58 fillOpacity: 1.0,
59 fillColor: '#FAE042'
60 });
61 }
62
63 private resetFeature(e) {
64 const layer = e.target;
65
66 layer.setStyle({
67 weight: 3,
68 opacity: 0.5,
69 color: '#008f68',
70 fillOpacity: 0.8,
71 fillColor: '#6DB65B'
72 });
73 }
74
75 private initStatesLayer() {
76 const stateLayer = L.geoJSON(this.states, {
77 style: (feature) => ({
78 weight: 3,
79 opacity: 0.5,
80 color: '#008f68',
81 fillOpacity: 0.8,
82 fillColor: '#6DB65B'
83 }),
84 onEachFeature: (feature, layer) => (
85 layer.on({
86 mouseover: (e) => (this.highlightFeature(e)),
87 mouseout: (e) => (this.resetFeature(e)),
88 })
89 )
90 });
91
92 this.map.addLayer(stateLayer);
93 stateLayer.bringToBack();
94 }
95
96 ngAfterViewInit(): void {
97 this.initMap();
98 // this.markerService.makeCapitalMarkers(this.map);
99 this.markerService.makeCapitalCircleMarkers(this.map);
100 this.shapeService.getStateShapes().subscribe(states => {
101 this.states = states;
102 this.initStatesLayer();
103 });
104 }
105}
保存更改。然后,在Web浏览器(localhost:4200)中打开应用程序,观察州首府的缩放圆形标记和州边界的形状:
 的地图屏幕截图
现在,您有了一个支持形状的地图。
总结
在本文中,您创建了一个加载数据和构造形状的形状服务。您添加了L.GeoJSON、SonEachFeature()和L.DomEvent.On的互动性。
这是关于使用Angular和Leaflet的4部分系列的总结。
如果你想了解更多关于Angular的知识,请查看我们的Angular主题页面获取练习和编程项目。