简介
传单支持_标记_。这些是放置在地图上的指示器,可以包含信息。这提供了一种在地图上突出显示地标和目的地的方法。
<$>[备注] 注意: 这是关于使用角度和传单的四部分系列的第二部分。 <$>
在本教程中,您将学习如何使用服务管理标记逻辑向地图添加标记。
预约
要完成本教程,您需要:
- 本教程直接基于以前的parts.]中的安装和步骤
第一步-下载GeoJSON数据
本教程将绘制美利坚合众国各州首府的GeoJSON数据。它还将包括一些关于州名称、首都名称和人口的其他元数据。
<$>[备注]
注意: usa-capals.Geojson文件在附带的工程repo.中提供
<$>
在assets目录下新建一个data对象:
1mkdir src/assets/data
然后,将usa-capals.Geojson文件保存到该目录中。
第二步-创建标记服务
在这一点上,您应该在一个角度应用程序中拥有了LEAFLE的工作实现。
使用终端窗口导航到项目目录。然后,运行以下命令来生成一个新服务:
1npx @angular/cli generate service marker --skip-tests
这将创建一个新文件:marker.service.ts。
接下来,将这个新服务作为提供者添加到您的app.mode.ts中。您还将从assets文件夹加载数据,因此需要包括HttpClientModule。
在代码编辑器中打开app.mode.ts并进行以下更改:
 1[label src/app/app.module.ts]
 2import { NgModule } from '@angular/core';
 3import { BrowserModule } from '@angular/platform-browser';
 4
 5import { HttpClientModule } from '@angular/common/http';
 6import { MarkerService } from './marker.service';
 7
 8import { AppComponent } from './app.component';
 9import { MapComponent } from './map/map.component';
10
11@NgModule({
12  declarations: [
13    AppComponent,
14    MapComponent
15  ],
16  imports: [
17    BrowserModule,
18    HttpClientModule
19  ],
20  providers: [
21    MarkerService
22  ],
23  bootstrap: [AppComponent]
24})
25export class AppModule { }
您的应用程序现在支持新的MarkerService。
第三步-加载和绘制标记
接下来,在代码编辑器中打开新创建的marker.service.ts,并将HttpClient添加到构造函数中:
 1[label src/app/marker.service.ts]
 2import { Injectable } from '@angular/core';
 3import { HttpClient } from '@angular/common/http';
 4
 5@Injectable({
 6  providedIn: 'root'
 7})
 8export class MarkerService {
 9  capitals: string = '/assets/data/usa-capitals.geojson';
10
11  constructor(private http: HttpClient) { }
12}
创建一个将加载GeoJSON数据并创建标记的新函数。此函数将接受单张地图作为参数。
修改marker.service.ts导入传单,声明make CapitalMarkers函数:
 1[label src/app/marker.service.ts]
 2import { Injectable } from '@angular/core';
 3import { HttpClient } from '@angular/common/http';
 4import * as L from 'leaflet';
 5
 6@Injectable({
 7  providedIn: 'root'
 8})
 9export class MarkerService {
10  capitals: string = '/assets/data/usa-capitals.geojson';
11
12  constructor(private http: HttpClient) { }
13
14  makeCapitalMarkers(map: L.map): void { }
15}
使用HttpClient获取数据,并`订阅‘结果。
获得数据后,您将遍历每个要素,构建标记,并将其添加到地图中。
 1[label src/app/marker.service.ts]
 2import { Injectable } from '@angular/core';
 3import { HttpClient } from '@angular/common/http';
 4import * as L from 'leaflet';
 5
 6@Injectable({
 7  providedIn: 'root'
 8})
 9export class MarkerService {
10  capitals: string = '/assets/data/usa-capitals.geojson';
11
12  constructor(private http: HttpClient) {
13  }
14
15  makeCapitalMarkers(map: L.map): void {
16    this.http.get(this.capitals).subscribe((res: any) => {
17      for (const c of res.features) {
18        const lon = c.geometry.coordinates[0];
19        const lat = c.geometry.coordinates[1];
20        const marker = L.marker([lat, lon]);
21
22        marker.addTo(map);
23      }
24    });
25  }
26}
此代码处理向地图加载和添加标记的逻辑。
现在,您必须从MapComponent调用此方法:
1[label src/app/map/map.component.ts]
2import { Component, AfterViewInit } from '@angular/core';
3import * as L from 'leaflet';
4import { MarkerService } from '../marker.service';
5
6@Component({
7 selector: 'app-map',
8 templateUrl: './map.component.html',
9 styleUrls: ['./map.component.css']
10})
11export class MapComponent implements AfterViewInit {
12 private map;
13
14 private initMap(): void {
15 this.map = L.map('map', {
16 center: [ 39.8282, -98.5795 ],
17 zoom: 3
18 });
19
20 const tiles = L.tileLayer('https://{s}.tile.openstreetmap.org/{z}/{x}/{y}.png', {
21 maxZoom: 18,
22 minZoom: 3,
23 attribution: '© <a href="http://www.openstreetmap.org/copyright">OpenStreetMap</a>'
24 });
25
26 tiles.addTo(this.map);
27 }
28
29 constructor(private markerService: MarkerService) { }
30
31 ngAfterViewInit(): void {
32 this.initMap();
33 this.markerService.makeCapitalMarkers(this.map);
34 }
35}
如果您要在此时运行应用程序,您将在控制台中遇到两个错误:
1[secondary_label Output]
2marker-icon-2x.png:1 GET http://localhost:4200/marker-icon-2x.png 404 (Not Found)
3marker-shadow.png:1 GET http://localhost:4200/marker-shadow.png 404 (Not Found)
您需要将LEAFLE的资源导入到您的项目中,才能引用mark-icon-2x.png和mark-shadow.png图像文件。
打开angular.json文件,添加LEAFLEImages目录:
 1[label angular.json]
 2{
 3  // ...
 4  "projects": {
 5    "angular-leaflet-example": {
 6      // ...
 7      "architect": {
 8        "build": {
 9          // ...
10          "options": {
11            // ...
12            "assets": [
13              "src/favicon.ico",
14              "src/assets",
15              {
16                "glob": "**/*",
17                "input": "node_modules/leaflet/dist/images/",
18                "output": "./assets"
19              }
20            ],
21            // ..
22          },
23          // ...
24        },
25        // ...
26      }
27    }},
28  "defaultProject": "angular-leaflet-example"
29}
此代码将在本地复制Leaflet的标记图像。
然后,重新访问map.Component.ts并定义图标:
1[label src/app/map/map.component.ts]
2import { Component, AfterViewInit } from '@angular/core';
3import * as L from 'leaflet';
4import { MarkerService } from '../marker.service';
5
6const iconRetinaUrl = 'assets/marker-icon-2x.png';
7const iconUrl = 'assets/marker-icon.png';
8const shadowUrl = 'assets/marker-shadow.png';
9const iconDefault = L.icon({
10 iconRetinaUrl,
11 iconUrl,
12 shadowUrl,
13 iconSize: [25, 41],
14 iconAnchor: [12, 41],
15 popupAnchor: [1, -34],
16 tooltipAnchor: [16, -28],
17 shadowSize: [41, 41]
18});
19L.Marker.prototype.options.icon = iconDefault;
20
21@Component({
22 selector: 'app-map',
23 templateUrl: './map.component.html',
24 styleUrls: ['./map.component.css']
25})
26export class MapComponent implements AfterViewInit {
27 private map;
28
29 constructor(private markerService: MarkerService) { }
30
31 private initMap(): void {
32 this.map = L.map('map', {
33 center: [ 39.8282, -98.5795 ],
34 zoom: 3
35 });
36
37 const tiles = L.tileLayer('https://{s}.tile.openstreetmap.org/{z}/{x}/{y}.png', {
38 maxZoom: 18,
39 minZoom: 3,
40 attribution: '© <a href="http://www.openstreetmap.org/copyright">OpenStreetMap</a>'
41 });
42
43 tiles.addTo(this.map);
44 }
45
46 ngAfterViewInit(): void {
47 this.initMap();
48 this.markerService.makeCapitalMarkers(this.map);
49 }
50}
保存您的更改。然后,停止您的应用程序并重新启动它。在您的Web浏览器(本地主机:4200)中打开应用程序,并观察各州首府的标记:
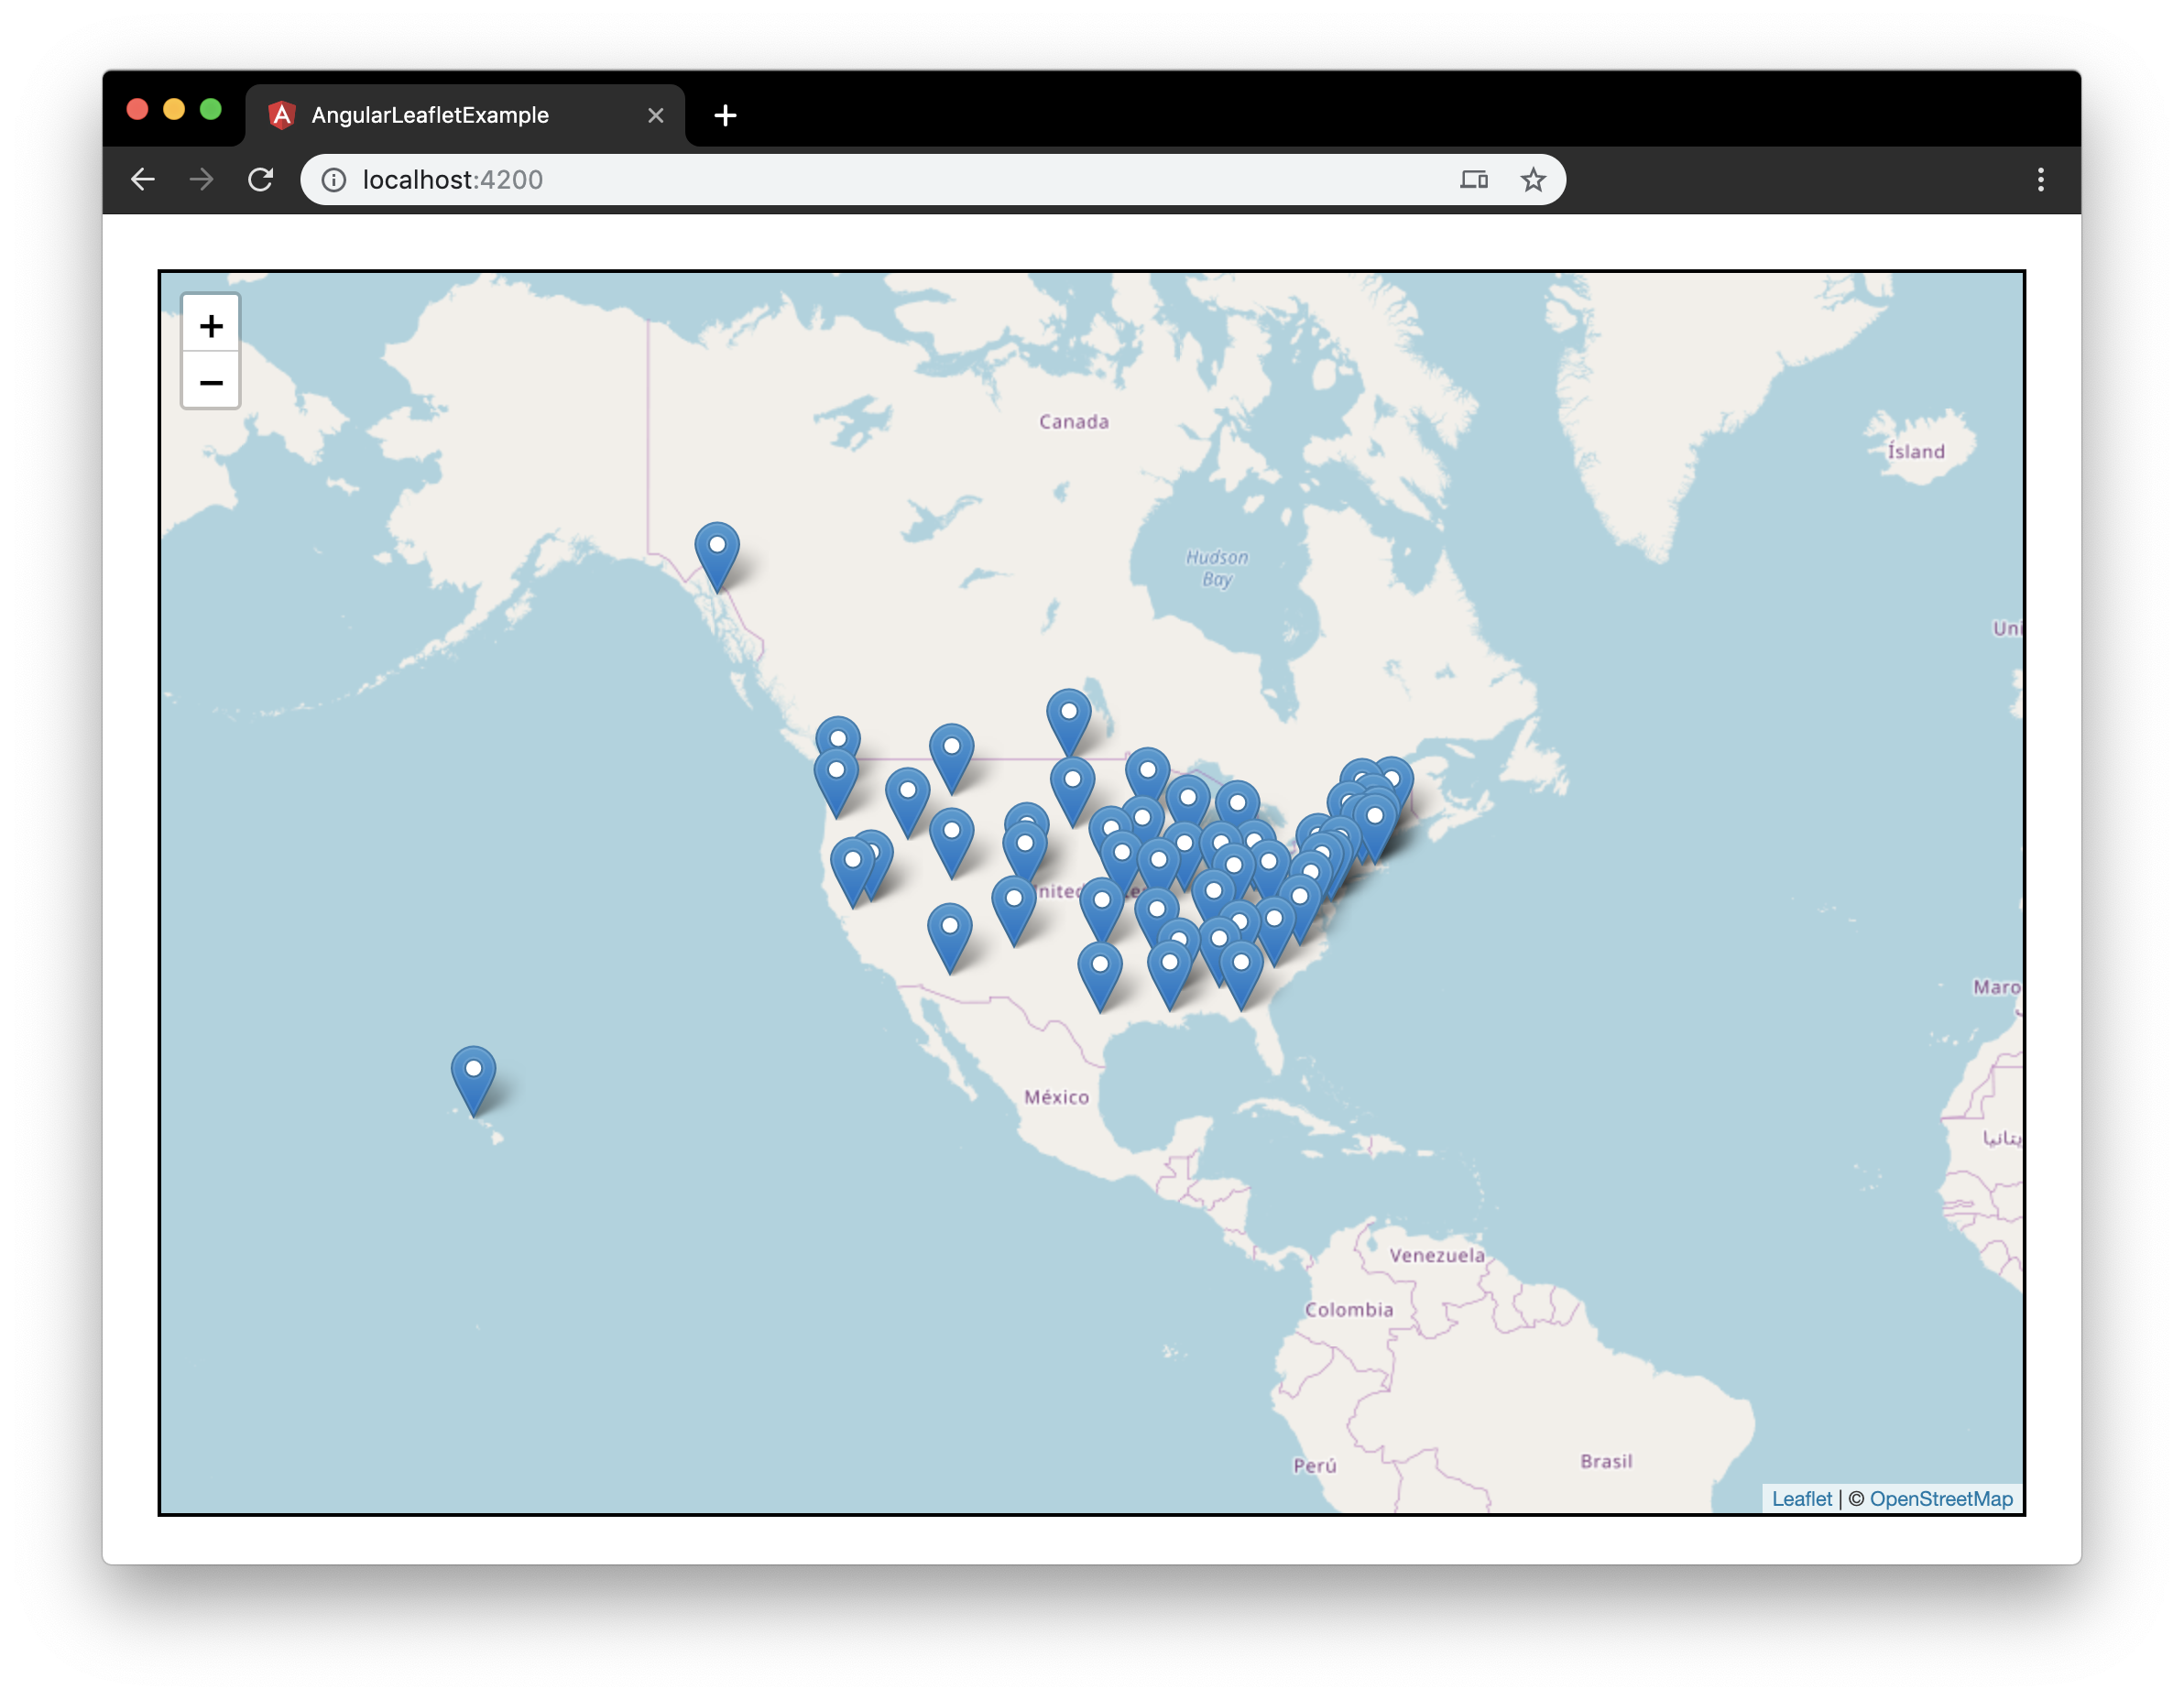 位置的标记别针的美国地图屏幕截图
此时,您就拥有了一个支持默认标记的地图。
第四步-显示圆形标记
在下一步中,您将把标记从图标更改为圆形。然后缩放圆圈的大小,以反映州议会大厦的人口。
打开MarkerService,创建一个make CapitalCircleMarkers()函数。它将非常类似于makrCapitalMarkers()函数。安装LEAFLET的marker方法后,您将使用CircleMarker方法:
 1[label src/app/marker.service.ts]
 2makeCapitalCircleMarkers(map: L.map): void {
 3  this.http.get(this.capitals).subscribe((res: any) => {
 4    for (const c of res.features) {
 5      const lon = c.geometry.coordinates[0];
 6      const lat = c.geometry.coordinates[1];
 7      const circle = L.circleMarker([lat, lon]);
 8
 9      circle.addTo(map);
10    }
11  });
12}
然后在MapComponent中调用此函数:
1[label src/app/map/map.component.ts]
2ngAfterViewInit(): void {
3  this.initMap();
4  // this.markerService.makeCapitalMarkers(this.map);
5  this.markerService.makeCapitalCircleMarkers(this.map);
6}
保存这些更改并在Web浏览器中打开应用程序(本地主机:4200):
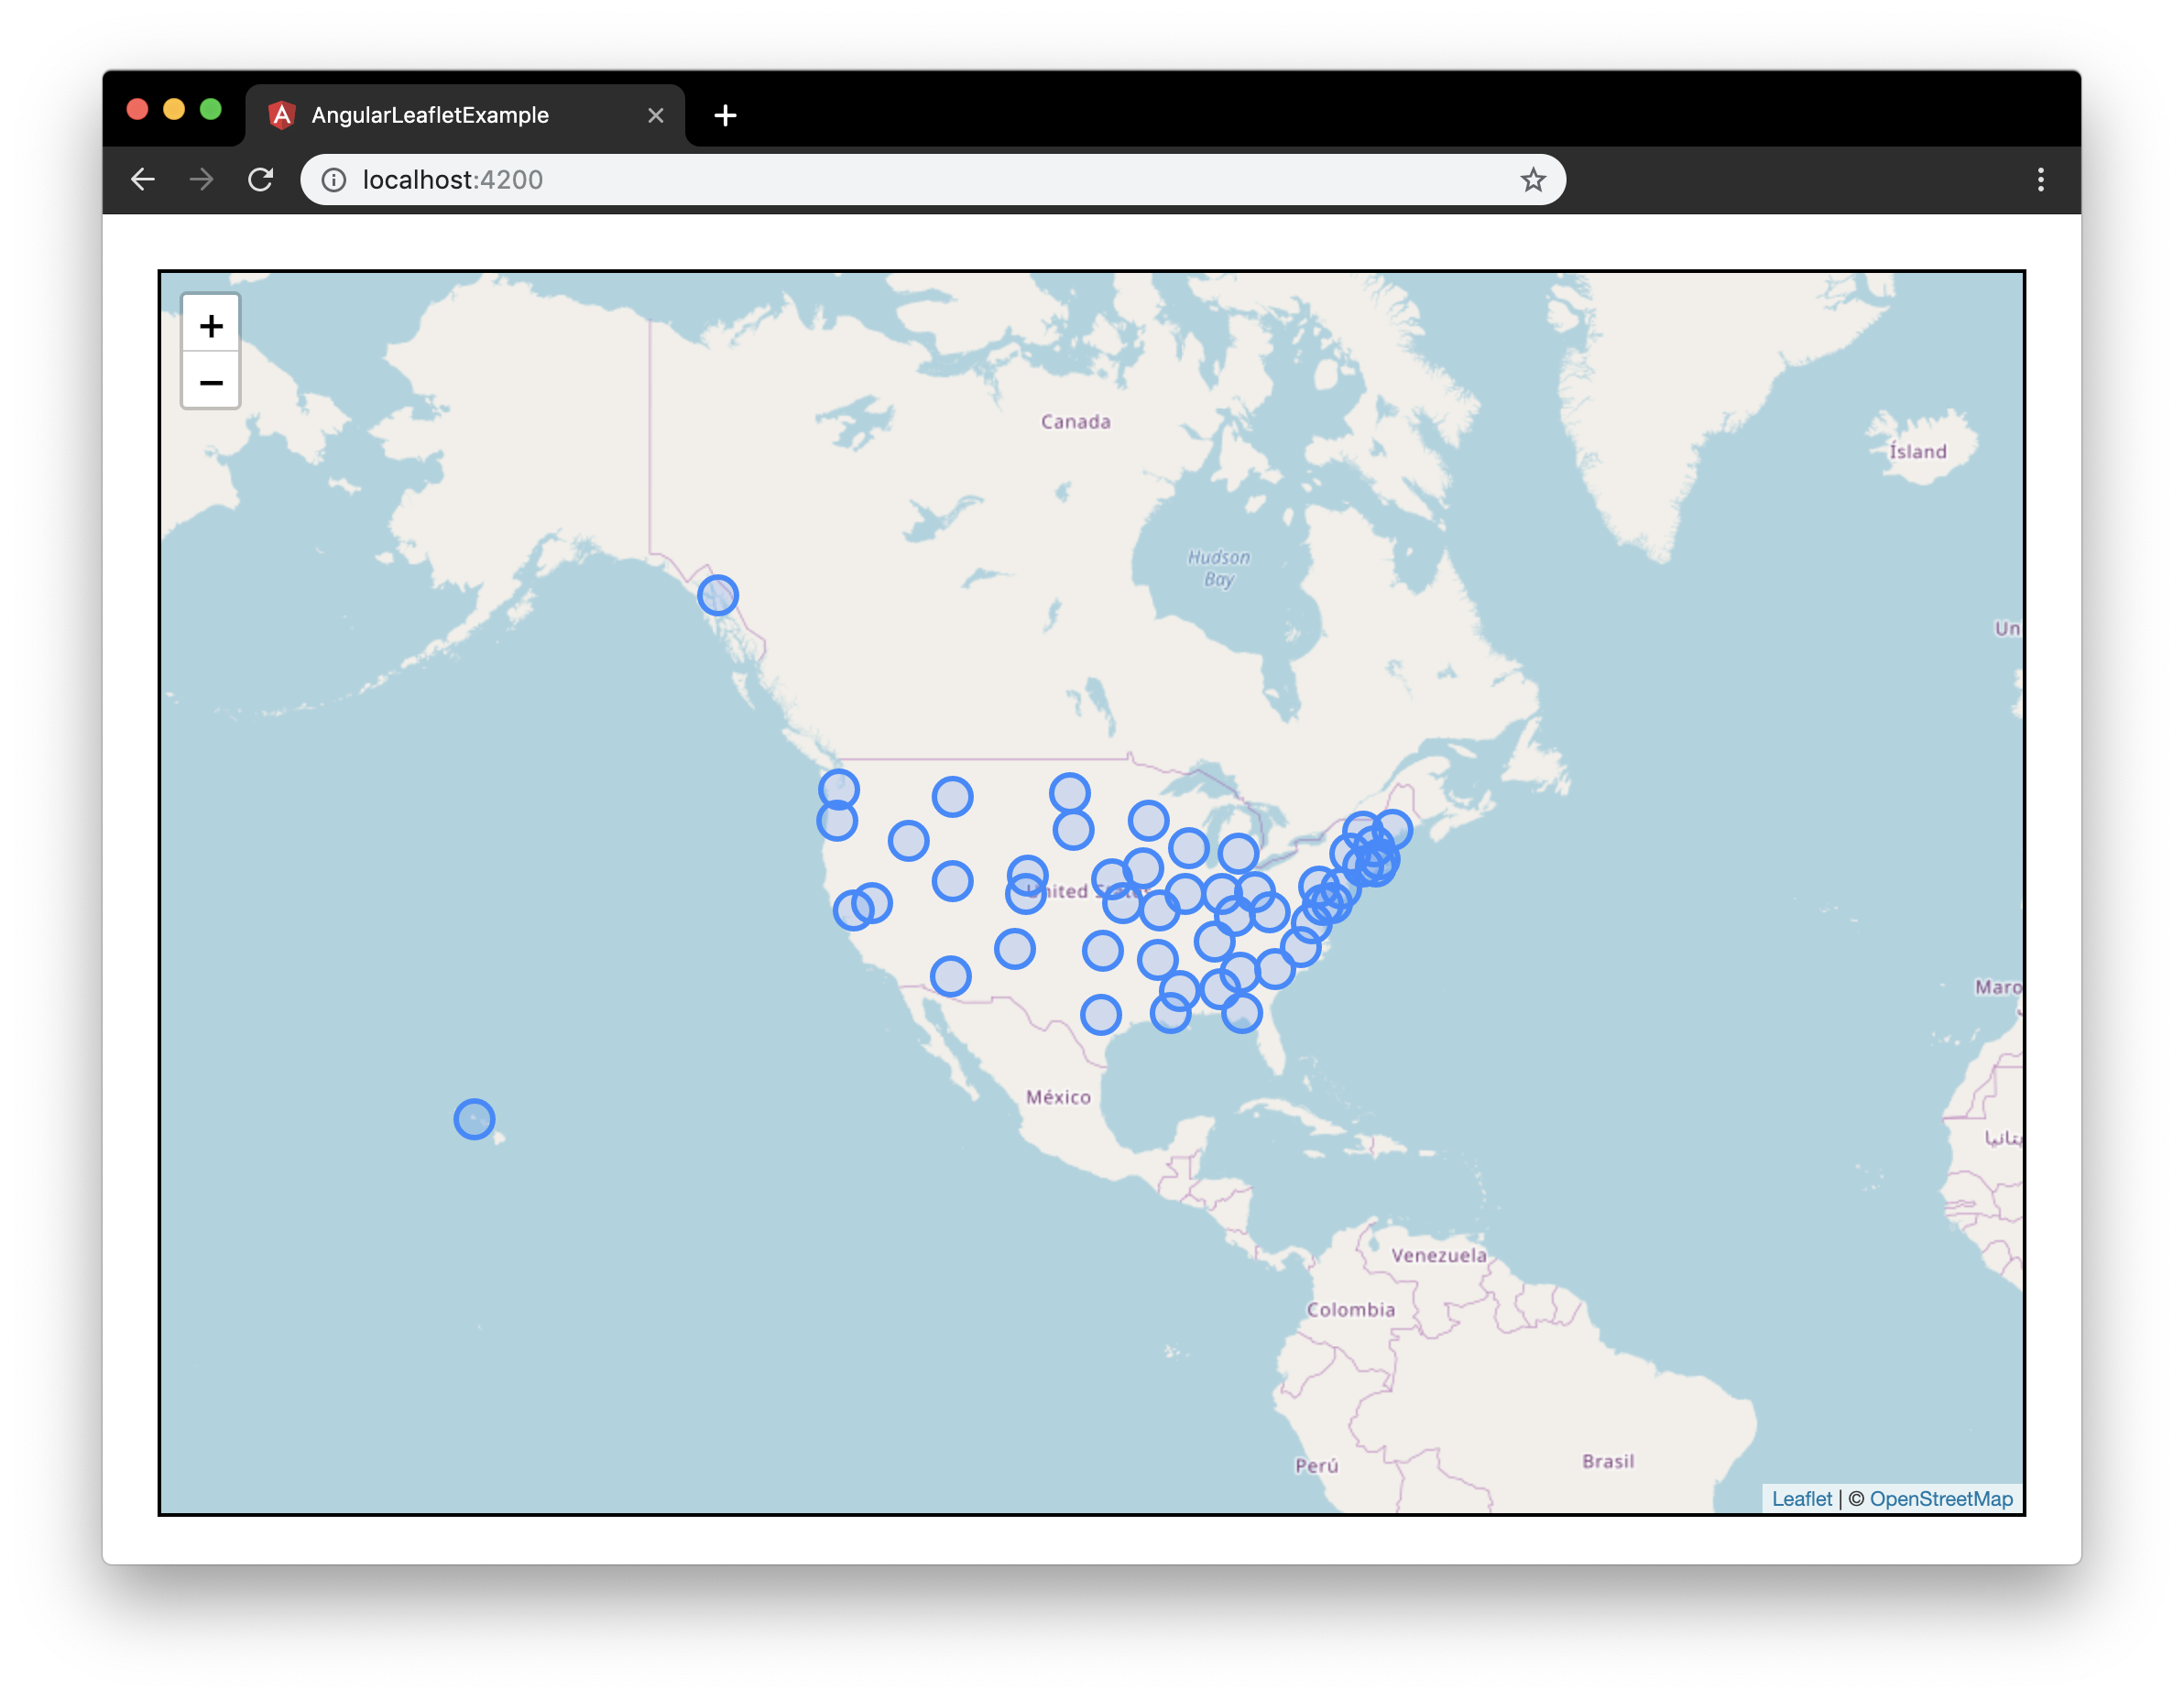 的位置
的位置
图标现在已经被圆圈取代。
CircleMarker接受第三个可选参数。此对象可以包含Radius属性。在您的MarkerService中,修改make CapitalCircleMarkers函数,使用半径20:
1const circle = L.circleMarker([lat, lon], { radius: 20 }).addTo(map);
此代码将所有半径的大小调整为相同的值(`20‘)。
接下来,您将更改半径以反映州首府的人口:
1static scaledRadius(val: number, maxVal: number): number {
2  return 20 * (val / maxVal);
3}
这个函数接受一个值(population),一个max值(maximum population),并返回一个范围[0 - 20]的半径。
您将使用扩散运算符和map来查找人口最多的首都:
1const maxPop = Math.max(...res.features.map(x => x.properties.population), 0);
根据GeoJSON的数据,最大的人口将是:亚利桑那州凤凰城(`1626078‘)。
最后,您将使用ScaledRadius作为RADIUS函数将它们组合在一起。
在代码编辑器中打开MarkerService并进行以下更改:
 1[label src/app/marker.service.ts]
 2import { Injectable } from '@angular/core';
 3import { HttpClient } from '@angular/common/http';
 4import * as L from 'leaflet';
 5
 6@Injectable({
 7  providedIn: 'root'
 8})
 9export class MarkerService {
10  capitals: string = '/assets/data/usa-capitals.geojson';
11
12  constructor(private http: HttpClient) { }
13
14  static scaledRadius(val: number, maxVal: number): number {
15    return 20 * (val / maxVal);
16  }
17
18  makeCapitalMarkers(map: L.map): void {
19    this.http.get(this.capitals).subscribe((res: any) => {
20      for (const c of res.features) {
21        const lon = c.geometry.coordinates[0];
22        const lat = c.geometry.coordinates[1];
23        const marker = L.marker([lat, lon]);
24
25        marker.addTo(map);
26      }
27    });
28  }
29
30  makeCapitalCircleMarkers(map: L.map): void {
31    this.http.get(this.capitals).subscribe((res: any) => {
32
33      const maxPop = Math.max(...res.features.map(x => x.properties.population), 0);
34
35      for (const c of res.features) {
36        const lon = c.geometry.coordinates[0];
37        const lat = c.geometry.coordinates[1];
38        const circle = L.circleMarker([lat, lon], {
39          radius: MarkerService.scaledRadius(c.properties.population, maxPop)
40        });
41
42        circle.addTo(map);
43      }
44    });
45  }
46}
保存您的更改。然后,停止您的应用程序并重新启动它。在您的Web浏览器(本地主机:4200)中打开该应用程序,并观察州首府的新的缩放圆圈标记:
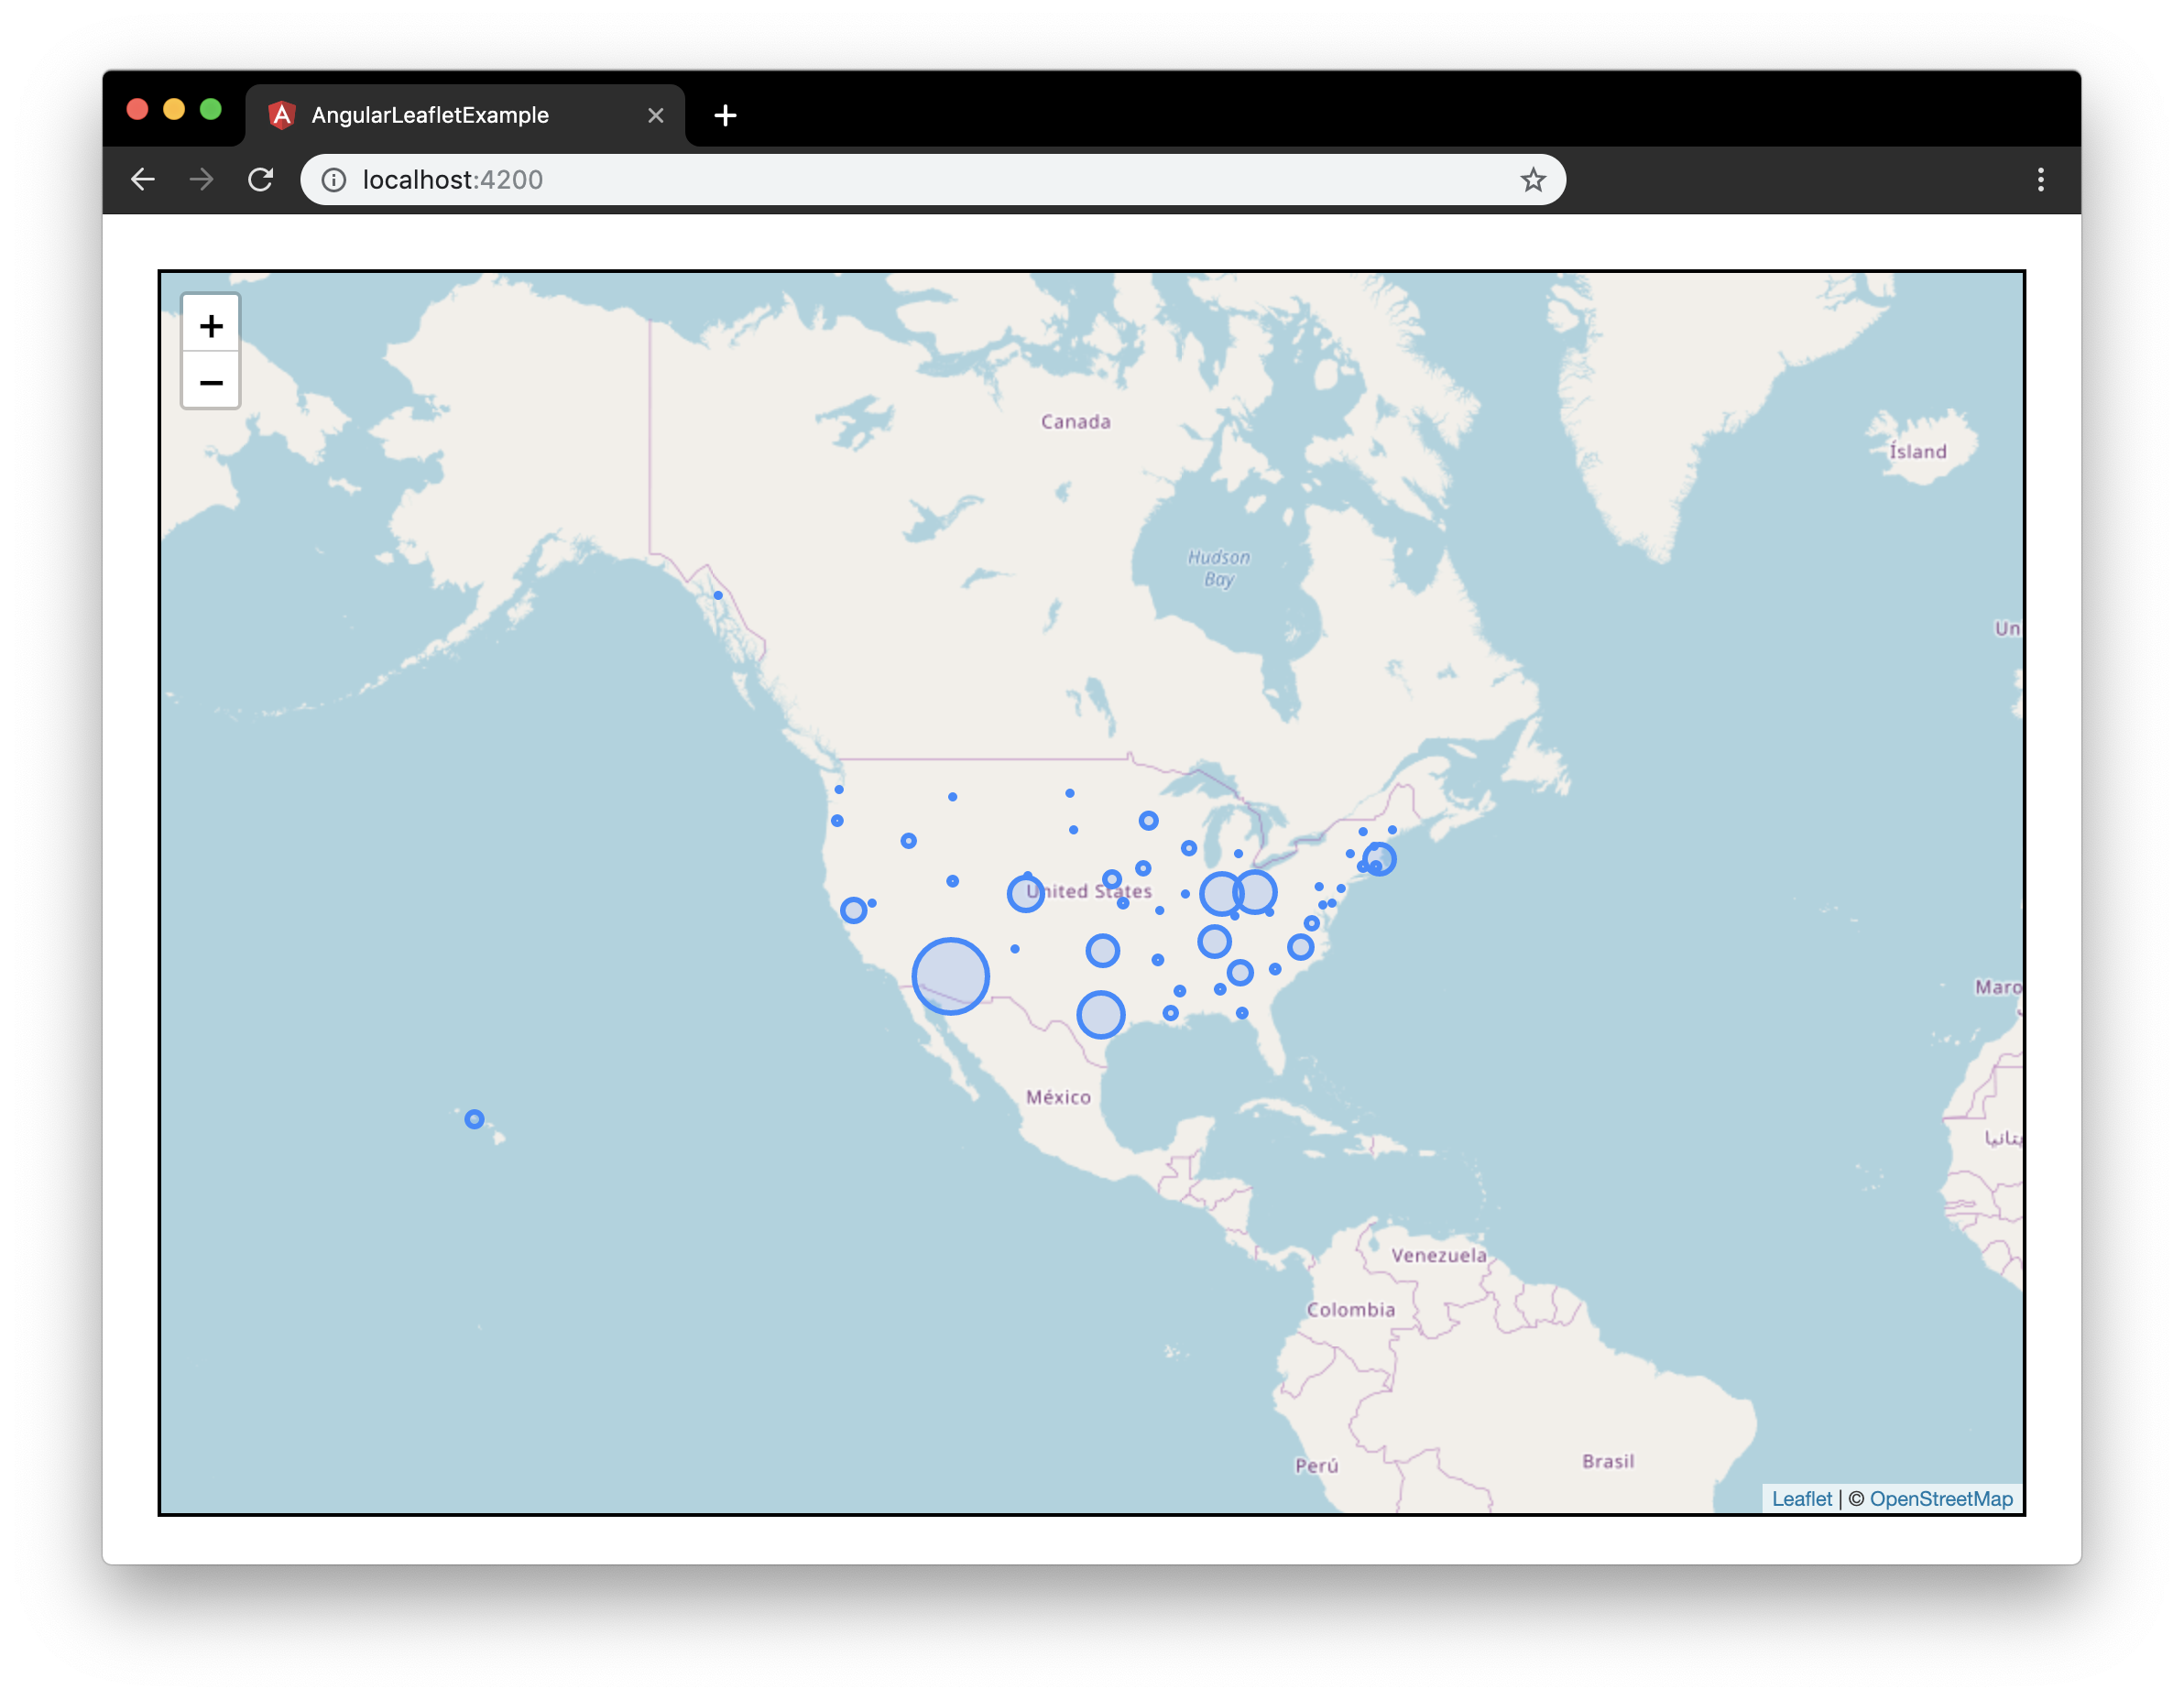
现在,您拥有了一个支持标记的地图。
结论
在本文中,您创建了一个加载数据和构造标记的标记服务。您学习了如何创建两种类型的标记:L.marker和L.CircleMarker。最后,您学习了如何通过传递半径函数来定义每个圆标记的大小。
继续关于使用ANGLE和Leaflet.的本系列文章的第3部分