在本教程中,我们将讨论并实现在Android应用程序中使用数据绑定的RecEconerView。
Android数据库视图DataBinding
要了解Android数据绑定的基础知识,请访问此tutorial.数据绑定显著减少了样板代码。在这里,我们将学习如何使用具有ViewHolder模式的RecyclerView实现数据绑定。此外,我们还将了解数据绑定如何使泛化Adapter类变得容易。最后,我们将演示如何在XML中直接传递适配器对象。
入门
在你的应用的Build.gradle中添加以下代码:
1android{
2...
3dataBinding {
4        enabled = true
5    }
6...
7}
添加以下依赖项。
1implementation 'com.android.support:design:28.0.0'
项目结构
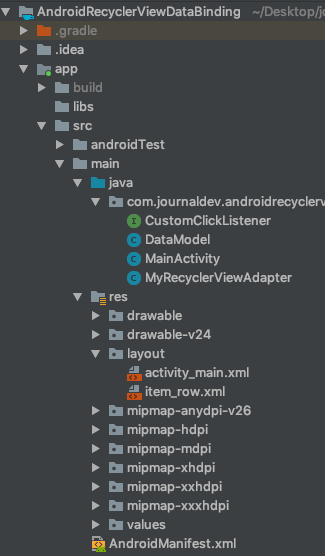 在下面的应用程序中,我们将使用
<data>从xml中加载回收视图适配器行中的数据。我们还将在布局行本身中设置onClickListener方法。
代码
DataModel.Java类的代码如下所示:
 1package com.journaldev.androidrecyclerviewdatabinding;
 2
 3public class DataModel {
 4
 5    public String androidVersion, androidName;
 6
 7    public DataModel(String androidName, String androidVersion) {
 8
 9        this.androidName = androidName;
10        this.androidVersion = androidVersion;
11    }
12}
active_main.xml布局代码如下:
 1<?xml version="1.0" encoding="utf-8"?>
 2<layout xmlns:android="https://schemas.android.com/apk/res/android"
 3    xmlns:app="https://schemas.android.com/apk/res-auto">
 4
 5    <data>
 6
 7    </data>
 8
 9    <android.support.constraint.ConstraintLayout
10        android:layout_width="match_parent"
11        android:layout_height="match_parent">
12
13        <android.support.v7.widget.RecyclerView
14            android:id="@+id/recyclerView"
15            android:layout_width="match_parent"
16            android:layout_height="match_parent"
17            app:layout_constraintBottom_toBottomOf="parent"
18            app:layout_constraintLeft_toLeftOf="parent"
19            app:layout_constraintRight_toRightOf="parent"
20            app:layout_constraintTop_toTopOf="parent" />
21
22    </android.support.constraint.ConstraintLayout>
23</layout>
MainActivity.java
 1package com.journaldev.androidrecyclerviewdatabinding;
 2
 3import android.databinding.DataBindingUtil;
 4import android.support.v7.app.AppCompatActivity;
 5import android.os.Bundle;
 6import android.support.v7.widget.LinearLayoutManager;
 7
 8import com.journaldev.androidrecyclerviewdatabinding.databinding.ActivityMainBinding;
 9
10import java.util.ArrayList;
11import java.util.List;
12
13public class MainActivity extends AppCompatActivity {
14
15    private ActivityMainBinding binding;
16
17    @Override
18    protected void onCreate(Bundle savedInstanceState) {
19        super.onCreate(savedInstanceState);
20        binding = DataBindingUtil.setContentView(this, R.layout.activity_main);
21        populateData();
22    }
23
24    private void populateData() {
25        List<DataModel> dataModelList = new ArrayList<>();
26
27        dataModelList.add(new DataModel("Android Oreo", "8.1"));
28        dataModelList.add(new DataModel("Android Pie", "9.0"));
29        dataModelList.add(new DataModel("Android Nougat", "7.0"));
30        dataModelList.add(new DataModel("Android Marshmallow", "6.0"));
31
32        MyRecyclerViewAdapter myRecyclerViewAdapter = new MyRecyclerViewAdapter(dataModelList, this);
33        binding.setMyAdapter(myRecyclerViewAdapter);
34    }
35}
在item_row.xml中定义了ClerView每一行的布局。
 1<?xml version="1.0" encoding="utf-8"?>
 2<layout xmlns:android="https://schemas.android.com/apk/res/android"
 3    xmlns:app="https://schemas.android.com/apk/res-auto">
 4
 5    <data>
 6
 7        <variable
 8            name="model"
 9            type="com.journaldev.androidrecyclerviewdatabinding.DataModel" />
10
11        <variable
12            name="itemClickListener"
13            type="com.journaldev.androidrecyclerviewdatabinding.CustomClickListener" />
14    </data>
15
16    <android.support.v7.widget.CardView
17        android:layout_width="match_parent"
18        android:layout_height="wrap_content"
19        android:onClick="@{() -> itemClickListener.cardClicked(model)}"
20        app:cardUseCompatPadding="true">
21
22        <LinearLayout
23            android:layout_width="wrap_content"
24            android:layout_margin="8dp"
25            android:layout_height="wrap_content"
26            android:orientation="vertical">
27
28            <TextView
29                android:id="@+id/tvAndroidName"
30                android:layout_width="wrap_content"
31                android:layout_height="wrap_content"
32                android:text="@{model.androidName}"
33                android:textAppearance="@style/TextAppearance.AppCompat.Headline" />
34
35            <TextView
36                android:id="@+id/tvAndroidVersion"
37                android:layout_width="wrap_content"
38                android:layout_height="wrap_content"
39                android:text="@{model.androidVersion}"
40                android:textAppearance="@style/TextAppearance.AppCompat.Subhead" />
41
42        </LinearLayout>
43
44    </android.support.v7.widget.CardView>
45
46</layout>
在data标记内,我们传递了两个变量--一个DataModel引用和一个CustomClickListener接口的引用,该接口的方法在CardView中被调用。CustomClickListener.java的代码定义如下:
1package com.journaldev.androidrecyclerviewdatabinding;
2
3public interface CustomClickListener {
4    void cardClicked(DataModel f);
5}
MyRecclerViewAdapter.java类的代码如下:
 1package com.journaldev.androidrecyclerviewdatabinding;
 2
 3import android.content.Context;
 4import android.databinding.DataBindingUtil;
 5import android.support.v7.widget.RecyclerView;
 6import android.view.LayoutInflater;
 7import android.view.ViewGroup;
 8import android.widget.Toast;
 9
10import java.util.List;
11
12import com.journaldev.androidrecyclerviewdatabinding.databinding.ItemRowBinding;
13
14public class MyRecyclerViewAdapter extends RecyclerView.Adapter<MyRecyclerViewAdapter.ViewHolder> implements CustomClickListener {
15
16    private List<DataModel> dataModelList;
17    private Context context;
18
19    public MyRecyclerViewAdapter(List<DataModel> dataModelList, Context ctx) {
20        this.dataModelList = dataModelList;
21        context = ctx;
22    }
23
24    @Override
25    public MyRecyclerViewAdapter.ViewHolder onCreateViewHolder(ViewGroup parent,
26                                                               int viewType) {
27        ItemRowBinding binding = DataBindingUtil.inflate(
28                LayoutInflater.from(parent.getContext()),
29                R.layout.item_row, parent, false);
30
31        return new ViewHolder(binding);
32    }
33
34    @Override
35    public void onBindViewHolder(ViewHolder holder, int position) {
36        DataModel dataModel = dataModelList.get(position);
37        holder.bind(dataModel);
38        holder.itemRowBinding.setItemClickListener(this);
39    }
40
41    @Override
42    public int getItemCount() {
43        return dataModelList.size();
44    }
45
46    public class ViewHolder extends RecyclerView.ViewHolder {
47        public ItemRowBinding itemRowBinding;
48
49        public ViewHolder(ItemRowBinding itemRowBinding) {
50            super(itemRowBinding.getRoot());
51            this.itemRowBinding = itemRowBinding;
52        }
53
54        public void bind(Object obj) {
55            itemRowBinding.setVariable(BR.model, obj);
56            itemRowBinding.executePendingBindings();
57        }
58    }
59
60    public void cardClicked(DataModel f) {
61        Toast.makeText(context, "You clicked " + f.androidName,
62                Toast.LENGTH_LONG).show();
63    }
64}
为了将数据传递给XML对等体,我们使用itemRowBinding.setVariable(BR.model,obj);将其绑定。为了立即执行数据绑定,ecutePendingBinding()非常重要。否则,它可能会填充不正确的视图。
setVariable()和setModel()的区别 setVariable()用于数据类型未知的一般情况。setModel()自动生成。我们可以使用以下代码来代替holder.ind(DataModel);。
1holder.itemRowBinding.setModel(dataModel);
使用数据绑定在RecEconerView XML中传递Adapter实例
多亏了数据绑定,我们可以通过在android:Adapter属性内的XML中传递适配器实例来进一步减少MainActivity.java中的样板代码,如下所示:active_main.xml
 1<?xml version="1.0" encoding="utf-8"?>
 2<layout xmlns:android="https://schemas.android.com/apk/res/android"
 3    xmlns:app="https://schemas.android.com/apk/res-auto">
 4
 5    <data>
 6
 7        <variable
 8            name="myAdapter"
 9            type="com.journaldev.androidrecyclerviewdatabinding.MyRecyclerViewAdapter" />
10    </data>
11
12    <android.support.constraint.ConstraintLayout
13        android:layout_width="match_parent"
14        android:layout_height="match_parent">
15
16        <android.support.v7.widget.RecyclerView
17            android:id="@+id/recyclerView"
18            android:layout_width="match_parent"
19            android:layout_height="match_parent"
20            android:adapter="@{myAdapter}"
21            app:layoutManager="android.support.v7.widget.LinearLayoutManager"
22            app:layout_constraintBottom_toBottomOf="parent"
23            app:layout_constraintLeft_toLeftOf="parent"
24            app:layout_constraintRight_toRightOf="parent"
25            app:layout_constraintTop_toTopOf="parent" />
26
27    </android.support.constraint.ConstraintLayout>
28</layout>
在MainActivity.Java中,我们现在可以通过以下方式设置Adapter:
1MyRecyclerViewAdapter myRecyclerViewAdapter = new MyRecyclerViewAdapter(dataModelList, this);
2binding.setMyAdapter(myRecyclerViewAdapter);
因此,甚至不需要在Activity类中初始化RecEconerView。上述实际应用程序的输出如下所示: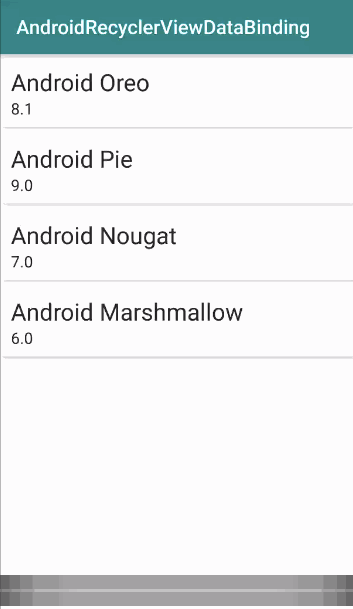 。您可以从下面的链接下载该项目。