在本教程中,我们将开发一个包含TabLayout、ViewPager和片段的应用程序。我们将实现将数据从一个片段传递到另一个片段的功能。
Android分片间传递数据
意图仅适用于在活动级别上发送数据。要在片段之间传递数据,我们需要创建自己的接口。将字符串数据从一个片段发送到另一个片段的流程如下所示。 之间传递数据让我们开始实现上面的流程。
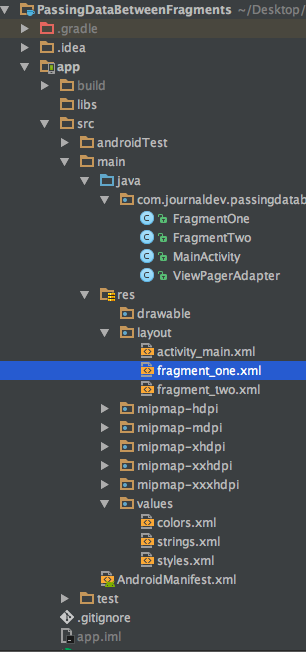
Android在Fragments Project结构之间传递数据
 之间共享数据MainActivity.Java 类的xml布局如下所示。
 1<?xml version="1.0" encoding="utf-8"?>
 2<android.support.design.widget.CoordinatorLayout xmlns:android="https://schemas.android.com/apk/res/android"
 3    xmlns:app="https://schemas.android.com/apk/res-auto"
 4    xmlns:tools="https://schemas.android.com/tools"
 5    android:layout_width="match_parent"
 6    android:layout_height="match_parent"
 7    android:fitsSystemWindows="true"
 8    tools:context="com.journaldev.passingdatabetweenfragments.MainActivity">
 9
10    <android.support.design.widget.AppBarLayout
11        android:layout_width="match_parent"
12        android:layout_height="wrap_content"
13        android:theme="@style/AppTheme.AppBarOverlay">
14
15        <android.support.v7.widget.Toolbar
16            android:id="@+id/toolbar"
17            android:layout_width="match_parent"
18            android:layout_height="?attr/actionBarSize"
19            android:background="?attr/colorPrimary"
20            app:popupTheme="@style/AppTheme.PopupOverlay" />
21
22        <android.support.design.widget.TabLayout
23            android:id="@+id/tabs"
24            style="@style/MyStyle"
25            android:layout_width="match_parent"
26            android:layout_height="wrap_content"
27            app:tabGravity="fill"
28            app:tabMode="fixed" />
29
30    </android.support.design.widget.AppBarLayout>
31
32    <android.support.v4.view.ViewPager
33        android:id="@+id/viewPager"
34        android:layout_width="match_parent"
35        android:layout_height="wrap_content"
36        app:layout_behavior="@string/appbar_scrolling_view_behavior" />
37
38</android.support.design.widget.CoordinatorLayout>
TabLayout和工具栏的样式在style es.xml 文件中定义,如下所示。
 1<resources>
 2
 3    <!-- Base application theme. -->
 4    <style name="AppTheme" parent="Theme.AppCompat.Light.NoActionBar">
 5        <!-- Customize your theme here. -->
 6        <item name="colorPrimary">@color/colorPrimary</item>
 7        <item name="colorPrimaryDark">@color/colorPrimaryDark</item>
 8        <item name="colorAccent">@color/colorAccent</item>
 9    </style>
10
11    <style name="AppTheme.AppBarOverlay" parent="ThemeOverlay.AppCompat.Dark.ActionBar" />
12
13    <style name="AppTheme.PopupOverlay" parent="ThemeOverlay.AppCompat.Light" />
14
15    <style name="MyStyle" parent="Widget.Design.TabLayout">
16        <item name="tabIndicatorColor">#FFFF</item>
17        <item name="tabIndicatorHeight">5dp</item>
18        <item name="tabPaddingStart">8dp</item>
19        <item name="tabPaddingEnd">8dp</item>
20    </style>
21
22</resources>
ViewPagerAdapter.java 是初始化碎片的地方。代码如下所示。
 1public class ViewPagerAdapter extends FragmentPagerAdapter {
 2
 3    public ViewPagerAdapter(FragmentManager fm) {
 4        super(fm);
 5    }
 6
 7    @Override
 8    public Fragment getItem(int position) {
 9        Fragment fragment = null;
10        if (position == 0) {
11            fragment = new FragmentOne();
12        } else if (position == 1) {
13            fragment = new FragmentTwo();
14        }
15        return fragment;
16    }
17
18    @Override
19    public int getCount() {
20        return 2;
21    }
22
23    @Override
24    public CharSequence getPageTitle(int position) {
25        String title = null;
26        if (position == 0) {
27            title = "Tab-1";
28        } else if (position == 1) {
29            title = "Tab-2";
30        }
31        return title;
32    }
33}
FragmentOne将把在EditText中输入的数据发送给FragmentTwo。Fragment_one.xml 的XML布局如下所示。
 1<?xml version="1.0" encoding="utf-8"?>
 2
 3<ScrollView xmlns:android="https://schemas.android.com/apk/res/android"
 4    android:layout_width="match_parent"
 5    android:layout_height="wrap_content"
 6    android:fillViewport="true">
 7
 8    <RelativeLayout
 9        android:layout_width="match_parent"
10        android:layout_height="wrap_content">
11
12        <EditText
13            android:id="@+id/inMessage"
14            android:layout_width="match_parent"
15            android:layout_height="wrap_content"
16            android:layout_above="@+id/btnPassData"
17            android:layout_margin="16dp"
18            android:hint="Enter here" />
19
20        <Button
21            android:id="@+id/btnPassData"
22            android:layout_width="wrap_content"
23            android:layout_height="wrap_content"
24            android:layout_centerInParent="true"
25            android:text="PASS DATA TO FRAGMENT TWO" />
26
27    </RelativeLayout>
28</ScrollView>
Fragment_two.xml 的XML布局如下所示。
 1<?xml version="1.0" encoding="utf-8"?>
 2<RelativeLayout xmlns:android="https://schemas.android.com/apk/res/android"
 3    android:layout_width="match_parent"
 4    android:layout_height="match_parent">
 5
 6    <TextView
 7        android:id="@+id/txtData"
 8        android:layout_width="wrap_content"
 9        android:layout_height="wrap_content"
10        android:textSize="20sp"
11        android:layout_centerInParent="true"
12        android:text="No data received" />
13
14</RelativeLayout>
FragmentOne.java 类的代码如下。
 1package com.journaldev.passingdatabetweenfragments;
 2
 3import android.content.Context;
 4import android.os.Bundle;
 5import android.support.annotation.Nullable;
 6import android.support.v4.app.Fragment;
 7import android.view.LayoutInflater;
 8import android.view.View;
 9import android.view.ViewGroup;
10import android.widget.Button;
11import android.widget.EditText;
12
13public class FragmentOne extends Fragment {
14
15    SendMessage SM;
16
17    @Nullable
18    @Override
19    public View onCreateView(LayoutInflater inflater, @Nullable ViewGroup container, @Nullable Bundle savedInstanceState) {
20        View rootView = inflater.inflate(
21                R.layout.fragment_one, container, false);
22        return rootView;
23
24    }
25
26    @Override
27    public void onViewCreated(View view, @Nullable Bundle savedInstanceState) {
28        super.onViewCreated(view, savedInstanceState);
29
30        Button btnPassData = (Button) view.findViewById(R.id.btnPassData);
31        final EditText inData = (EditText) view.findViewById(R.id.inMessage);
32        btnPassData.setOnClickListener(new View.OnClickListener() {
33            @Override
34            public void onClick(View v) {
35                SM.sendData(inData.getText().toString().trim());
36            }
37        });
38
39    }
40
41    interface SendMessage {
42        void sendData(String message);
43    }
44
45    @Override
46    public void onAttach(Context context) {
47        super.onAttach(context);
48
49        try {
50            SM = (SendMessage) getActivity();
51        } catch (ClassCastException e) {
52            throw new ClassCastException("Error in retrieving data. Please try again");
53        }
54    }
55}
自定义接口SendMessage是在上面的onAttach方法中初始化的。该接口将在我们将很快看到的MainActivity.Java 中实现。** FragmentTwo.java** 类的代码如下。
 1package com.journaldev.passingdatabetweenfragments;
 2
 3import android.os.Bundle;
 4import android.support.annotation.Nullable;
 5import android.support.v4.app.Fragment;
 6import android.view.LayoutInflater;
 7import android.view.View;
 8import android.view.ViewGroup;
 9import android.widget.TextView;
10
11public class FragmentTwo extends Fragment {
12
13    TextView txtData;
14
15    @Nullable
16    @Override
17    public View onCreateView(LayoutInflater inflater, @Nullable ViewGroup container, @Nullable Bundle savedInstanceState) {
18        View rootView = inflater.inflate(
19                R.layout.fragment_two, container, false);
20        return rootView;
21    }
22
23    @Override
24    public void onViewCreated(View view, @Nullable Bundle savedInstanceState) {
25        super.onViewCreated(view, savedInstanceState);
26
27        txtData = (TextView)view.findViewById(R.id.txtData);
28    }
29
30    protected void displayReceivedData(String message)
31    {
32        txtData.setText("Data received: "+message);
33    }
34}
FragmentTwo.java 的实例上的displayReceivedData()将从** MainActivity.java** 内的Custom接口的方法中调用,如下所示。
 1package com.journaldev.passingdatabetweenfragments;
 2
 3import android.support.design.widget.TabLayout;
 4import android.support.v4.view.ViewPager;
 5import android.support.v7.app.AppCompatActivity;
 6import android.os.Bundle;
 7import android.support.v7.widget.Toolbar;
 8
 9public class MainActivity extends AppCompatActivity implements FragmentOne.SendMessage{
10
11    TabLayout tabLayout;
12    ViewPager viewPager;
13    ViewPagerAdapter viewPagerAdapter;
14
15    @Override
16    protected void onCreate(Bundle savedInstanceState) {
17        super.onCreate(savedInstanceState);
18        setContentView(R.layout.activity_main);
19        Toolbar toolbar = (Toolbar) findViewById(R.id.toolbar);
20        setSupportActionBar(toolbar);
21
22        viewPager = (ViewPager) findViewById(R.id.viewPager);
23        viewPagerAdapter = new ViewPagerAdapter(getSupportFragmentManager());
24        viewPager.setAdapter(viewPagerAdapter);
25        tabLayout = (TabLayout) findViewById(R.id.tabs);
26        tabLayout.setupWithViewPager(viewPager);
27    }
28
29    @Override
30    public void sendData(String message) {
31        String tag = "android:switcher:" + R.id.viewPager + ":" + 1;
32        FragmentTwo f = (FragmentTwo) getSupportFragmentManager().findFragmentByTag(tag);
33        f.displayReceivedData(message);
34    }
35}
只要按下FragmentOne中的Button,就会触发上面代码中的sendData()方法。我们使用findFragmentByTag 方法获取已在ViewPagerAdapter中初始化的FragmentTwo。运行中的上述应用程序的输出如下所示。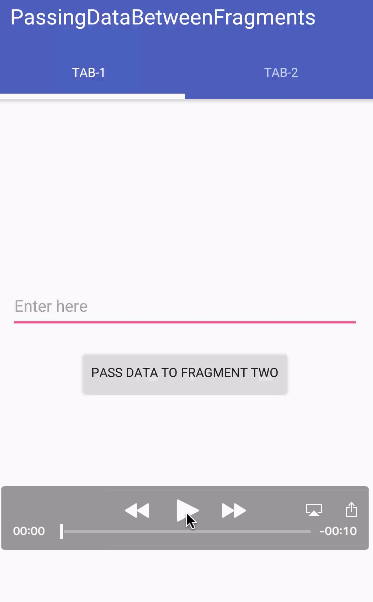 本教程就此结束。您可以通过下面的链接下载最终的** Android PassingDataBetweenFragments项目** 。