在本教程中,我们将提供Android布局的概述。我们还将探索一些可用于组织屏幕内容的特定布局控件,即Android LinearLayout和Android RelativeLayout。
Android布局
用户界面的基本构建块是从View类创建的View 对象,它在屏幕上占据一个矩形区域。视图是TextView、Button、EditText等UI组件的基类,** ViewGroup** 是View的子类。可以将一个或多个视图组合到一个视图组中。一个ViewGroup提供了Android布局,我们可以在其中对视图的外观和顺序进行排序。例如:LinearLayout、FrameLayout、RelativeLayout等。
Android布局类型
Android提供了以下组视图组或布局:
1.LinearLayout:是一个将所有子项垂直或水平对齐的ViewGroup
2.RelativeLayout:按相对位置展示子视图的ViewGroup
3.AbsoluteLayout:允许我们指定子视图和小部件的确切位置
4.TableLayout:是将其子视图分组为行和列的视图
5.FrameLayout:屏幕上的占位符,用于显示单个视图
6.ScrollView:FrameLayout是一种特殊类型的FrameLayout,它允许用户滚动浏览比物理显示占用更多空间的视图列表。ScrollView只能包含一个子视图或ViewGroup,通常为LinearLayout
7.ListView:显示可滚动项列表的视图组
8.GridView:是一个在二维滚动网格中显示项目的ViewGroup。网格中的项来自与此视图关联的ListAdapter
在本教程中,我们将重点介绍两种最常用的Android布局:
1.线条布局 2.相对布局
Android布局属性
1.Android:ID :唯一标识该视图的ID
2.Android:Layout_Width :布局宽度
3.Android:Layout_Height :布局高度
4.Android:Layout_March :这是视图外部的额外空间。例如,如果给出android:armenleft=20dp,则视图将在从左起20dp之后排列
5.Android:Layout_Padding :类似于** Android:Layout_March** ,只是指定了view内部** 的额外空间
6.Android:Layout_Graight :指定子视图的位置
7.Android:Layout_Weight :指定布局中的额外空间应该分配给视图多少
8.Android:Layout_x :指定布局的x坐标
9.Android:Layout_y :指定布局的y坐标
Android:Layout_Width=WRAP_CONTENT 告诉视图根据其内容所需的尺寸调整大小。Android:Layout_Width=** Match_Parent** 告诉视图要变大到父视图的大小。
查看标识
在XML标记中,ID的语法为:
- 字符串开头的at符号(@)表示XML解析器应解析和展开ID字符串的其余部分,并将其标识为ID资源
- 加号(+)表示这是必须创建并添加到我们的资源中的新资源名称
Android LinearLayout
Android LinearLayout沿着一条线组织元素。我们可以使用android:orientation指定这条线是垂直的还是水平的。默认情况下,方向为水平。垂直的LinearLayout每行只有一个子元素(因此它是一列单个元素),而水平的LinearLayout在屏幕上只有一行元素。Android:Layout_Weight 属性描述了元素的重要性。重量越大的元素占用的屏幕空间越大。以下是使用LinearLayout:layout_linear.xml的示例布局XML
 1<LinearLayout xmlns:android="https://schemas.android.com/apk/res/android"
 2    android:orientation="vertical"
 3    android:layout_width="fill_parent"
 4    android:layout_height="fill_parent"
 5    android:layout_margin="@dimen/activity_horizontal_margin">
 6    <Button
 7        android:id="@+id/backbutton"
 8        android:text="Back"
 9        android:layout_width="wrap_content"
10        android:layout_height="wrap_content" />
11    <TextView
12        android:text="Row 2"
13        android:layout_width="wrap_content"
14        android:textSize="18sp"
15        android:layout_margin="10dp"
16        android:layout_height="wrap_content" />
17    <TextView
18        android:text="Row 3"
19        android:textSize="18sp"
20        android:layout_margin="10dp"
21        android:layout_width="wrap_content"
22        android:layout_height="wrap_content" />
23    <TextView
24        android:text="Row 4"
25        android:textSize="18sp"
26        android:layout_margin="10dp"
27        android:layout_width="wrap_content"
28        android:layout_height="wrap_content" />
29    <TextView
30        android:text="Row 5"
31        android:textSize="18sp"
32        android:layout_margin="10dp"
33        android:layout_width="wrap_content"
34        android:layout_height="wrap_content" />
35
36    <LinearLayout
37        android:orientation="horizontal"
38        android:layout_width="match_parent"
39        android:layout_height="wrap_content">
40        <Button
41            android:id="@+id/next_button"
42            android:text="next"
43            android:layout_width="wrap_content"
44            android:layout_height="wrap_content" />
45        <TextView
46            android:text="Row 6b"
47            android:textSize="18sp"
48            android:layout_margin="10dp"
49            android:layout_gravity="center"
50            android:layout_width="wrap_content"
51            android:layout_height="wrap_content" />
52        <TextView
53            android:text="Row 6c"
54            android:textSize="18sp"
55            android:layout_margin="10dp"
56            android:layout_gravity="center"
57            android:layout_width="wrap_content"
58            android:layout_height="wrap_content" />
59        <TextView
60            android:text="Row 6d"
61            android:textSize="18sp"
62            android:layout_margin="10dp"
63            android:layout_gravity="center"
64            android:layout_width="wrap_content"
65            android:layout_height="wrap_content" />
66
67    </LinearLayout>
68
69</LinearLayout>
在这个布局中,我们有一个具有垂直方向的父`LinearLayout‘,它包含作为子视图的按钮、文本视图和嵌套的线性布局(具有水平方向)。注意 :嵌套布局不一定是一种类型。例如,我们可以将LinearLayout作为RelativeLayout中的一个子项,反之亦然。
Android RelativeLayout
Android RelativeLayout根据元素之间的关系以及与父容器的关系来布局元素。这是最复杂的布局之一,我们需要几个属性才能实际获得我们想要的布局。也就是说,使用RelativeLayout,我们可以将视图定位为to LeftOf 、** to RightOf** 、** 下方** 或** 上方** 。我们还可以相对于其父视图定位视图,例如** 水平居中** 、** 垂直居中** 或两者兼而有之,或者与父RelativeLayout的任意边缘对齐。如果在子视图上未指定这些属性,则默认情况下,该视图呈现在左上角位置。
Android RelativeLayout属性
以下是RelativeLayout 使用的主要属性。它们涉及三个不同的类别:
相对于容器
- Android:Layout_alignParentBottom:将元素的底部放在容器的底部
- Android:Layout_alignParentLeft:将元素的左侧放置在容器的左侧
- Android:Layout_alignParentRight:将元素的右侧放置在容器的右侧
- Android:Layout_alignParentTop:将元素放置在容器顶部
- Android:Layout_centerHoriz卧式:使元素在其父容器内水平居中
- android:Layout_centerInParent:元素在其容器内水平和垂直居中
- android:Layout_centerVertical:将元素在其父容器中垂直居中
相对于兄弟姐妹
- android:Layout_Over:将元素放在指定元素的上方
- android:Layout_Below:将元素放置在指定元素下方
- android:Layout_toLeftOf:将元素放在指定元素的左侧
- android:Layout_toRightOf:将元素放在指定元素的右侧
@id/XXXXX用于通过id引用元素。要记住的一件事是,在声明元素之前引用它会产生错误,因此在这种情况下应该使用@+id/。
与其他元素对齐
- Android:Layout_alignBaseline:将新元素的基线与指定元素的基线对齐
- android:layout_alignBottom:将新元素的底部与指定元素的底部对齐
- Android:Layout_alignLeft:将新元素的左边缘与指定元素的左边缘对齐
- Android:Layout_alignRight:将新元素的右边缘与指定元素的右边缘对齐
- android:Layout_alignTop:将新元素的顶部与指定元素的顶部对齐
下面的XML布局使用RelativeLayout:layout_relative.xml
 1<RelativeLayout
 2    android:layout_width="fill_parent"
 3    android:layout_height="fill_parent"
 4    xmlns:android="https://schemas.android.com/apk/res/android">
 5    <Button
 6        android:id="@+id/backbutton"
 7        android:text="Back"
 8        android:layout_width="wrap_content"
 9        android:layout_height="wrap_content" />
10    <TextView
11        android:id="@+id/firstName"
12        android:text="First Name"
13        android:textSize="18sp"
14        android:layout_width="wrap_content"
15        android:layout_height="wrap_content"
16        android:layout_below="@id/backbutton" />
17    <TextView
18        android:id="@+id/editFirstName"
19        android:text="JournalDev"
20        android:textSize="18sp"
21        android:layout_width="wrap_content"
22        android:layout_marginLeft="10dp"
23        android:layout_height="wrap_content"
24        android:layout_toRightOf="@id/firstName"
25        android:layout_below="@id/backbutton"/>
26    <TextView
27        android:id="@+id/editLastName"
28        android:text="Layout Tutorial Example"
29        android:textSize="18sp"
30        android:layout_width="wrap_content"
31        android:layout_height="wrap_content"
32        android:layout_alignTop="@+id/lastName"
33        android:layout_toRightOf="@+id/lastName"
34        android:layout_toEndOf="@+id/lastName" />
35    <TextView
36        android:id="@+id/lastName"
37        android:text="Last Name"
38        android:textSize="18sp"
39        android:layout_width="wrap_content"
40        android:layout_height="wrap_content"
41        android:layout_marginTop="48dp"
42        android:layout_below="@+id/firstName"
43        android:layout_alignParentLeft="true"
44        android:layout_alignParentStart="true"
45        android:layout_marginRight="10dp"
46        android:layout_marginLeft="40dp"
47        android:layout_marginStart="40dp" />
48
49    <Button
50        android:id="@+id/next"
51        android:text="Next"
52        android:layout_width="wrap_content"
53        android:layout_height="wrap_content"
54        android:layout_below="@+id/editLastName"
55        android:layout_alignLeft="@+id/editLastName"
56        android:layout_alignStart="@+id/editLastName"
57        android:layout_marginTop="37dp" />
58</RelativeLayout>
正如你所看到的,我们可以根据元素的相对位置重新排列它们。下面的xml布局表示一个自定义布局,它具有嵌套的线性布局和相对布局。layout_mixed.xml
 1<RelativeLayout
 2    android:layout_width="fill_parent"
 3    android:layout_height="fill_parent"
 4    xmlns:android="https://schemas.android.com/apk/res/android">
 5
 6    <TextView
 7        android:id="@+id/parent_rl"
 8        android:text="Parent RelativeLayout"
 9        android:textSize="18sp"
10        android:layout_width="wrap_content"
11        android:layout_height="wrap_content" />
12
13    <LinearLayout
14        android:orientation="horizontal"
15        android:layout_width="match_parent"
16        android:layout_height="wrap_content"
17        android:id="@+id/linearLayout"
18        android:layout_below="@id/parent_rl"
19        android:layout_alignParentRight="true"
20        android:layout_alignParentEnd="true">
21
22        <TextView
23            android:text="Nested Horizontal"
24            android:textSize="18sp"
25            android:layout_margin="10dp"
26            android:layout_width="wrap_content"
27            android:layout_height="wrap_content" />
28
29        <TextView
30            android:text="LL"
31            android:textSize="18sp"
32            android:layout_margin="10dp"
33            android:layout_width="wrap_content"
34            android:layout_height="wrap_content" />
35
36        <LinearLayout
37            android:orientation="vertical"
38            android:layout_width="wrap_content"
39            android:layout_height="wrap_content">
40
41            <TextView
42                android:text="Double Nested"
43                android:textSize="18sp"
44                android:layout_margin="10dp"
45                android:layout_gravity="center"
46                android:layout_width="wrap_content"
47                android:layout_height="wrap_content" />
48            <TextView
49                android:text="Vertical"
50                android:textSize="18sp"
51                android:layout_margin="10dp"
52                android:layout_gravity="center"
53                android:layout_width="wrap_content"
54                android:layout_height="wrap_content" />
55            <TextView
56                android:text="LL"
57                android:textSize="18sp"
58                android:layout_margin="10dp"
59                android:layout_gravity="center"
60                android:layout_width="wrap_content"
61                android:layout_height="wrap_content" />
62
63        </LinearLayout>
64
65    </LinearLayout>
66
67    <RelativeLayout
68        android:layout_width="match_parent"
69        android:layout_height="match_parent"
70        android:layout_below="@id/linearLayout">
71
72    <TextView
73        android:layout_width="wrap_content"
74        android:layout_height="wrap_content"
75        android:textAppearance="?android:attr/textAppearanceMedium"
76        android:text="Nested Relative Layout"
77        android:id="@+id/textView"
78        android:layout_alignParentTop="true"
79        android:layout_centerHorizontal="true" />
80
81        <Button
82            android:id="@+id/back_button_pressed"
83            android:text="back"
84            android:layout_width="wrap_content"
85            android:layout_height="wrap_content"
86            android:layout_below="@+id/textView"
87            android:layout_centerHorizontal="true"
88            android:layout_marginTop="66dp" />
89
90    </RelativeLayout>
91
92</RelativeLayout>
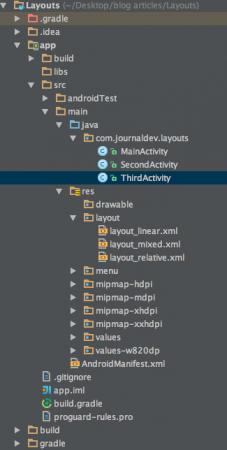
Android布局项目结构
Android布局代码
应用程序启动到MainActivity,该活动通过以下代码加载layout_linear.xml内容:
 1package com.journaldev.layouts;
 2
 3import android.content.Intent;
 4import android.support.v7.app.AppCompatActivity;
 5import android.os.Bundle;
 6import android.view.Menu;
 7import android.view.MenuItem;
 8import android.view.View;
 9import android.widget.Button;
10
11public class MainActivity extends AppCompatActivity {
12
13    Button back,next;
14    @Override
15    protected void onCreate(Bundle savedInstanceState) {
16        super.onCreate(savedInstanceState);
17        setContentView(R.layout.layout_linear);
18        back=(Button)findViewById(R.id.back_button);
19        next=(Button)findViewById(R.id.next_button);
20
21        next.setOnClickListener(new View.OnClickListener() {
22            @Override
23            public void onClick(View v) {
24                Intent intent=new Intent(MainActivity.this,SecondActivity.class);
25                intent.setFlags(Intent.FLAG_ACTIVITY_CLEAR_TOP);
26                startActivity(intent);
27            }
28        });
29        back.setOnClickListener(new View.OnClickListener() {
30            @Override
31            public void onClick(View v) {
32                finish();
33            }
34        });
35
36    }
37
38}
ond dActivity和ThirdActivity分别加载layout_relative.xml和layout_Mixed.xml布局,如下所示:
 1package com.journaldev.layouts;
 2
 3import android.app.Activity;
 4import android.content.Intent;
 5import android.os.Bundle;
 6import android.view.View;
 7import android.widget.Button;
 8
 9public class SecondActivity extends Activity {
10    Button back,next;
11    @Override
12    protected void onCreate(Bundle savedInstanceState) {
13        super.onCreate(savedInstanceState);
14        setContentView(R.layout.layout_relative);
15        back=(Button)findViewById(R.id.backbutton);
16        next=(Button)findViewById(R.id.next);
17
18        next.setOnClickListener(new View.OnClickListener() {
19            @Override
20            public void onClick(View v) {
21                Intent intent=new Intent(SecondActivity.this,ThirdActivity.class);
22                intent.setFlags(Intent.FLAG_ACTIVITY_CLEAR_TOP);
23                startActivity(intent);
24            }
25        });
26        back.setOnClickListener(new View.OnClickListener() {
27            @Override
28            public void onClick(View v) {
29                Intent intent=new Intent(SecondActivity.this,MainActivity.class);
30                intent.setFlags(Intent.FLAG_ACTIVITY_CLEAR_TOP);
31                startActivity(intent);
32            }
33        });
34
35    }
36}
 1package com.journaldev.layouts;
 2
 3import android.app.Activity;
 4import android.content.Intent;
 5import android.os.Bundle;
 6import android.view.View;
 7import android.widget.Button;
 8
 9public class ThirdActivity extends Activity {
10    Button back;
11    @Override
12    protected void onCreate(Bundle savedInstanceState) {
13        super.onCreate(savedInstanceState);
14        setContentView(R.layout.layout_mixed);
15        back=(Button)findViewById(R.id.back_button_pressed);
16
17        back.setOnClickListener(new View.OnClickListener() {
18            @Override
19            public void onClick(View v) {
20                Intent intent=new Intent(ThirdActivity.this,SecondActivity.class);
21                intent.setFlags(Intent.FLAG_ACTIVITY_CLEAR_TOP);
22                startActivity(intent);
23            }
24        });
25
26    }
27}
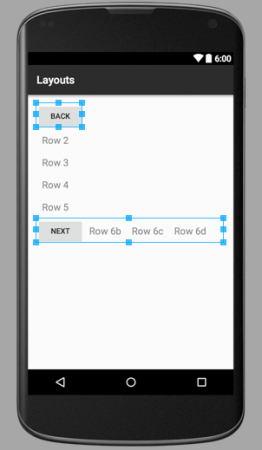
三个布局文件的图片输出如下所示:Layout_linear.xml  如您所见,父LinearLayout由6个子元素组成,在单个垂直列中,其中一个是嵌套的LinearLayout子视图,在水平方向上包含4个组件。** Layout_Relative.xml**
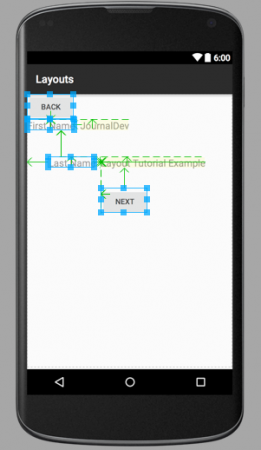
  上图中指向的箭头描绘了兄弟姐妹相对于彼此和相对于容器的位置。** Layout_Mixed.xml**
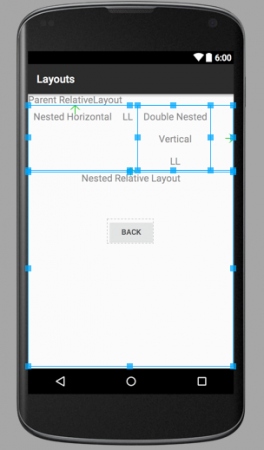
  此相对布局由嵌套的水平LinearLayout内的垂直LinearLayout和子RelativeLayout组成。注意:属于不同布局的组件不是同级组件,因此不能相对于彼此定位。它们的容器布局是兄弟关系,可以相对于彼此进行定位。如果您对蓝色线条的矩形和箭头感到疑惑,那是因为图像来自图形视图中的XML布局。当您运行该应用程序时,这些蓝色线条和矩形将不会显示。这就结束了Android布局教程。在接下来的教程中,我们将介绍其他** Android布局** 。您可以通过下面的链接下载最终的** Android布局项目** 。
下载Android LinearLayout RelativeLayout示例Project
参考:Doc接口
