今天,我们将学习Android片段生命周期,并在Android应用程序中实现由两个片段组成的单个Activity类。
Android分片
Android中的Fragment类用于构建动态用户界面。活动中应使用分片 。片段的最大优势是它简化了为多种屏幕尺寸创建UI的任务。一个活动可以包含任意数量的片段。Android片段本身并不像大多数其他UI组件那样是View的子类。取而代之的是,片段中有一个视图。正是这个视图最终显示在片段所在的活动中。因为Android片段不是视图,所以将其添加到活动中与添加视图(例如TextView)看起来有些不同。一个片段被添加到活动内部的** 查看组** 中。片段的视图显示在此ViewGroup中。下图描述了将片段添加到活动中时发生的情况: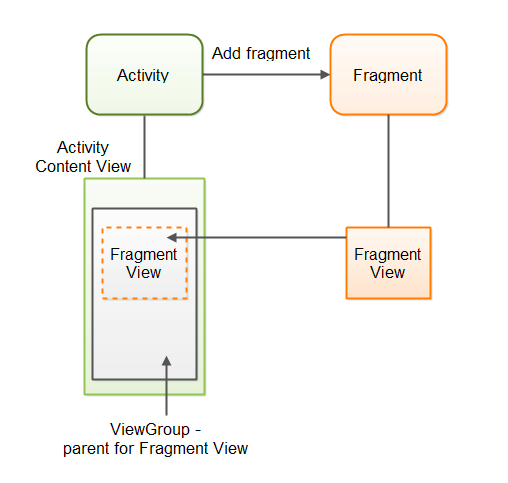 首先,活动获取对片段的引用。然后,它获得对将在其中呈现片段的视图的ViewGroup的引用。然后,该活动添加该片段。然后,片段创建其视图并将其返回给活动。然后,该视图被插入到ViewGroup父级中,并且片段处于活动状态。
分片生命周期
Android分片生命周期如下图所示。 下面是分片生命周期的方法。
1.onAttach():这个方法会先被调用,甚至会在onCreate()之前被调用,让我们知道您的片段已经附加到了某个活动上。向您传递将托管您的片段的活动
2.onCreateView():分片第一次绘制用户界面时,系统会调用该回调。要绘制片段的UI,必须从此方法返回一个View组件,该方法是片段布局的根。如果片段没有提供UI,我们可以返回NULL
3.onViewCreated():onCreateView()后调用。这在继承onCreateView()实现时特别有用,但我们需要配置结果视图,例如使用ListFragment以及何时设置适配器
4.onActivityCreated():在onCreate()和onCreateView()之后调用,表示该活动的onCreate()已经完成。如果在依赖于活动的onCreate()已完成其工作的片段中存在需要初始化的内容,则onActivityCreated()可用于该初始化工作
5.onStart():一旦片段可见,就会调用onStart()方法
6.onPause():系统调用该方法作为用户离开分片的第一个指示。这通常是您应该提交应在当前用户会话之后保留的任何更改的位置
7.onStop():通过调用onStop()停止分片
8.onDestroyView():在onDestroy()之前调用。这与我们在其中设置UI的onCreateView()对应。如果有特定于UI的东西需要清理,那么可以将该逻辑放在onDestroyView()中
9.onDestroy():调用onDestroy()对分片的状态进行最终清理,但不保证被Android平台调用。
10.onDetach():在onDestroy()之后调用,通知分片已与其托管活动解除关联
Android分片类
Fragments已添加到Honeycomb中的Android API(API 11)。
1.android.app.Fragment:所有分片定义的基类
2.android.app.FragmentManager:与活动内部的分片对象交互的类
3.android.app.FragmentTransaction:执行一组原子分片操作的类
当使用Google提供的兼容包库时,将使用以下类来实现。
android.support.v4.app.FragmentActivity:使用基于兼容性的片段(和加载器)功能的所有活动的基类android.support.v4.app.Fragmentandroid.support.v4.app.FragmentManagerandroid.support.v4.app.FragmentTransaction
Android片段onCreateView()
下面是使用onCreateView()实现它的示例片段:
 1public class SampleFragment extends Fragment {
 2
 3    @Override
 4    public View onCreateView(LayoutInflater inflater, ViewGroup parentViewGroup,
 5                             Bundle savedInstanceState) {
 6
 7        View rootView = inflater.inflate(R.layout.fragment_sample, parentViewGroup, false);
 8        return rootView;
 9    }
10}
onCreateView()方法获取LayoutInflater、ViewGroup和Bundle作为参数。LayoutInflater是一个可以基于Layout XML文件创建View实例的组件。如您所见,该示例实际上是通过调用layout.inflate()实现这一点的。inflate()方法有三个参数:布局XML文件(在R.layout内)的id、片段的视图要插入到的父视图组,以及第三个布尔值,该布尔值指示是否应该将从布局XML文件放大的片段的视图插入到父视图组中。在本例中,我们将传递False,因为View将通过我们调用的一些Android代码附加到其他位置的父视图组。将False作为最后一个参数传递给Inflate()时,父视图组仍用于膨胀视图的布局计算,因此不能将NULL作为父视图组传递。OnCreateView()的ViewGroup参数是要插入分片的View的父视图组。这是活动中的一个ViewGroup,它将)的Bundle参数是一个Bundle,分片可以在其中保存数据,就像在活动中一样。
Android分片示例
Android片断示例项目由包含两个片断的单个活动组成:TextFragment和MenuFragment。
Android分片示例代码
MainActivity包含两个片段TextFragment和MenuFragment。因此,让我们首先在xml布局activity_main.xml中定义片段
 1<LinearLayout xmlns:android="https://schemas.android.com/apk/res/android"
 2    android:layout_width="match_parent"
 3    android:layout_height="match_parent"
 4    android:orientation="horizontal"
 5    android:weightSum="1.0">
 6
 7    <fragment
 8        android:layout_height="match_parent"
 9        android:layout_width="match_parent"
10        class="journaldev.com.fragments.fragments.MenuFragment"
11        android:id="@+id/fragment"
12        android:layout_weight="0.5"/>
13    <fragment
14        android:layout_width="match_parent"
15        android:layout_height="match_parent"
16        class="journaldev.com.fragments.fragments.TextFragment"
17        android:id="@+id/fragment2"
18        android:layout_weight="0.5"/>
19</LinearLayout>
正如我们所看到的,作为本活动一部分的片段的类文件被定义为class=journaldev.com.fragments.fragments.TextFragment ,片段类及其布局的定义如下面的片段所示。
 1package journaldev.com.fragments.fragments;
 2
 3import android.app.Fragment;
 4import android.os.Bundle;
 5import android.view.LayoutInflater;
 6import android.view.View;
 7import android.view.ViewGroup;
 8import android.widget.TextView;
 9
10import journaldev.com.fragments.R;
11public class TextFragment extends Fragment {
12    TextView text,vers;
13
14    @Override
15
16    public View onCreateView(LayoutInflater inflater,ViewGroup container, Bundle savedInstanceState) {
17
18        View view = inflater.inflate(R.layout.text_fragment, container, false);
19        text= (TextView) view.findViewById(R.id.AndroidOs);
20        vers= (TextView)view.findViewById(R.id.Version);
21
22        return view;
23
24    }
25    public void change(String txt, String txt1){
26        text.setText(txt);
27        vers.setText(txt1);
28
29    }
30}
Text_Fragment.xml
 1<?xml version="1.0" encoding="utf-8"?>
 2
 3<LinearLayout xmlns:android="https://schemas.android.com/apk/res/android"
 4    android:orientation="vertical"
 5    android:layout_width="match_parent"
 6    android:gravity="center"
 7    android:background="#5ba4e5"
 8    android:layout_height="match_parent">
 9
10    <TextView
11        android:layout_width="wrap_content"
12        android:layout_height="wrap_content"
13        android:textSize="40px"
14        android:textColor="#ffffff"
15        android:layout_gravity="center"
16        android:id="@+id/AndroidOs"/>
17    <TextView
18        android:layout_width="wrap_content"
19        android:layout_height="wrap_content"
20        android:layout_gravity="center"
21        android:textColor="#ffffff"
22        android:textSize="30px"
23        android:id="@+id/Version"/>
24
25</LinearLayout>
TextFragment由包含Android版本名称和编号的文本视图组成。
 1package journaldev.com.fragments.fragments;
 2
 3import android.app.ListFragment;
 4import android.os.Bundle;
 5import android.view.LayoutInflater;
 6import android.view.View;
 7import android.view.ViewGroup;
 8import android.widget.ArrayAdapter;
 9import android.widget.ListView;
10
11import journaldev.com.fragments.R;
12public class MenuFragment extends ListFragment {
13    String[] AndroidOS = new String[] { "Cupcake","Donut","Eclair","Froyo","Gingerbread","Honeycomb","Ice Cream SandWich","Jelly Bean","KitKat" };
14    String[] Version = new String[]{"1.5","1.6","2.0-2.1","2.2","2.3","3.0-3.2","4.0","4.1-4.3","4.4"};
15    @Override
16
17    public View onCreateView(LayoutInflater inflater,ViewGroup container, Bundle savedInstanceState) {
18        View view =inflater.inflate(R.layout.list_fragment, container, false);
19        ArrayAdapter<String> adapter = new ArrayAdapter<String>(getActivity(),
20                android.R.layout.simple_list_item_1, AndroidOS);
21        setListAdapter(adapter);
22
23        return view;
24
25    }
26    @Override
27    public void onListItemClick(ListView l, View v, int position, long id) {
28        TextFragment txt = (TextFragment)getFragmentManager().findFragmentById(R.id.fragment2);
29        txt.change(AndroidOS[position],"Version : "+Version[position]);
30        getListView().setSelector(android.R.color.holo_blue_dark);
31    }
32}
List_Fragment.xml
 1<?xml version="1.0" encoding="utf-8"?>
 2
 3<LinearLayout xmlns:android="https://schemas.android.com/apk/res/android"
 4    android:orientation="vertical"
 5    android:layout_width="match_parent"
 6    android:layout_height="match_parent">
 7    <ListView
 8        android:layout_width="match_parent"
 9        android:layout_height="wrap_content"
10        android:id="@android:id/list" />
11</LinearLayout>
MenuFragment显示一个ListView。正如我们在这里看到的,ListView的布局是DEFAULT SIMPLE_LIST_ITEM_1,而不是我们在上一篇文章中为ListView创建的定制布局。MainActivity从onCreate方法调用setContent View,仅此而已。从XML文件中调用这些片段。或者,我们可以使用FragmentManager添加Activity类中的片段,如下面的代码片段所示:
1getFragmentManager()
2                  .beginTransaction()
3                  .add(R.id.fragmentParentViewGroup, new MyFragment())
4                  .commit();
这里的id碎片化ParentViewGroup 属于如下所示的FrameLayout:
1<FrameLayout xmlns:android="https://schemas.android.com/apk/res/android"
2             xmlns:tools="https://schemas.android.com/tools"
3             android:id="@+id/fragmentParentViewGroup"
4             android:layout_width="match_parent"
5             android:layout_height="match_parent"
6             tools:context=".MyActivity"
7             tools:ignore="MergeRootFrame" />
Android分片示例App
下面显示了我们的项目产生的输出,您可以看到这里有两个片段,当您在左侧片段中选择其中的任何一个时,数据将填充到右侧片段中。 您可以从下面的链接下载最终的Android Fragment项目 。