在本教程中,我们将讨论Android ConstraintLayout 的复杂之处。谷歌在2016年谷歌I/O大会上推出了Android Constraint Layout编辑器。新的布局编辑器有一套强大的工具,允许开发人员为他们的复杂布局创建平面用户界面层次结构。
Android Construction Layout
要使用Android ConstraintLayout,请确保您使用的是最新版本的Android Studio。理想情况下,Android Studio 2.2及更高版本。我们需要从SDK管理器下载ConstraintLayout所需的SDK工具。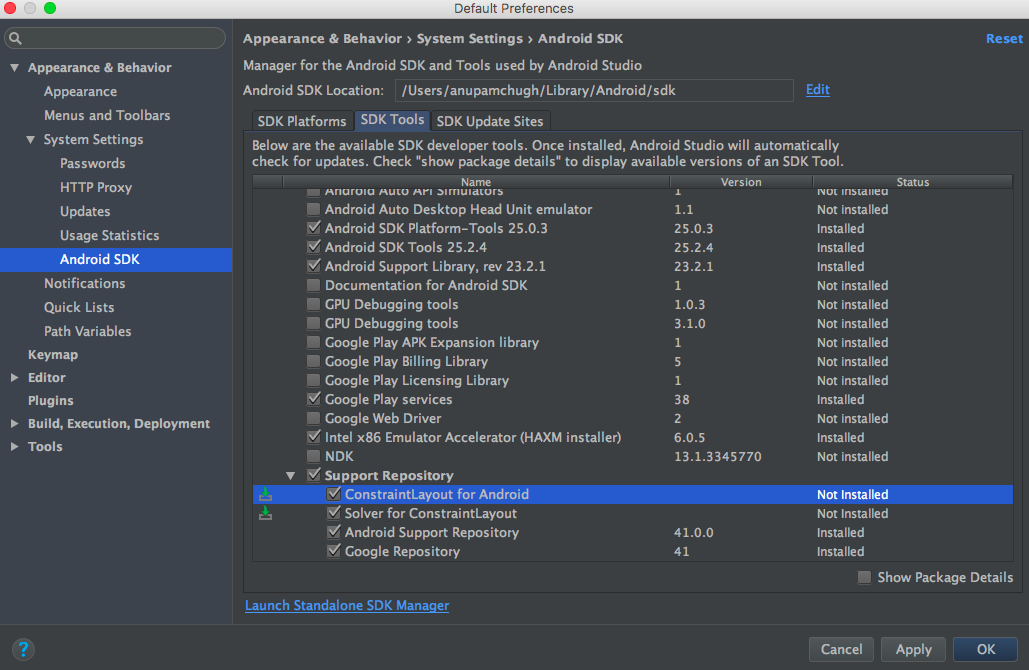 新建一个空的活动项目,并在build.gradle 文件中添加如下依赖项。
编译‘com.android.support.constraint:constraint-layout:1.0.0-beta4’创建一个新布局,根类设置为ConstraintLayout,如下图所示。 可将旧布局转换为ConstraintLayout。打开相应布局的设计窗格,右击根组件并选择相关选项,如下图所示。
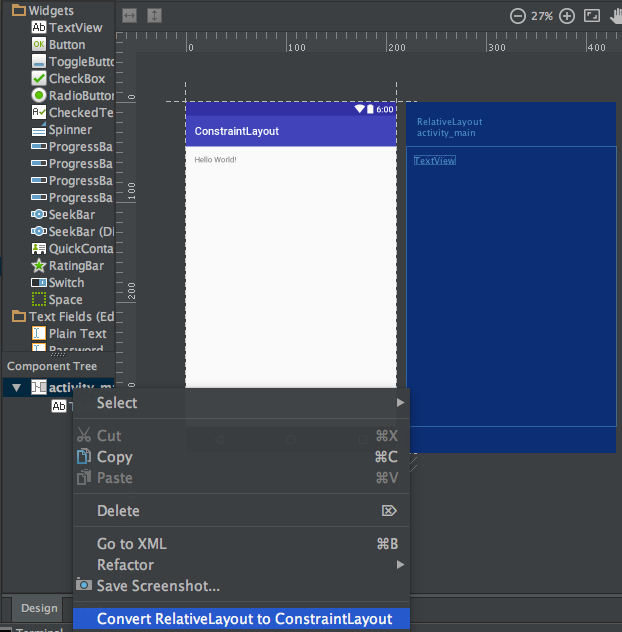
Android约束布局概述
Android ConstraintLayout用于定义布局,方法是为每个子视图/小部件分配相对于其他视图的约束。ConstraintLayout类似于RelativeLayout,但功能更强大。ConstraintLayout的目标是通过移除具有平面和灵活设计的嵌套视图来提高应用程序的性能。ConstraintLayout内的视图的每一侧都有控制柄(或锚点),用于分配约束。让我们将TextView拖放到布局上,并为其分配约束。 上面的TextView有三种句柄:
调整手柄 -它位于四角,用于调整视图大小,但保持其约束不变。** 侧手柄** --位于两侧中心的圆形手柄。用于设置视图的上、左、下、右约束。** 基线句柄** --用于将基线与布局中的另一个文本视图对齐。
让我们为TextView分配约束并研究它的XML代码。 注意右侧的属性检查器窗格:
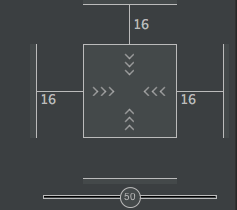 它显示为视图的每一侧设置的边距。它还允许通过在以下模式之间切换来更改视图的大小:
- 包装内容 -这将包装视图以填充其内容。

- 任意大小 -类似于匹配父级。

- 固定大小 -允许我们设置恒定的宽度和高度。

上述布局的XML代码如下所示:sample.xml
 1<?xml version="1.0" encoding="utf-8"?>
 2<android.support.constraint.ConstraintLayout
 3    xmlns:android="https://schemas.android.com/apk/res/android"
 4    xmlns:app="https://schemas.android.com/apk/res-auto"
 5    android:layout_width="match_parent"
 6    android:layout_height="match_parent">
 7
 8    <TextView
 9        android:text="TextView"
10        android:layout_width="wrap_content"
11        android:layout_height="wrap_content"
12        android:id="@+id/textView"
13        android:layout_marginStart="16dp"
14        android:layout_marginTop="16dp"
15        app:layout_constraintLeft_toLeftOf="parent"
16        app:layout_constraintTop_toTopOf="parent"
17        android:layout_marginLeft="16dp"
18        android:layout_marginEnd="16dp"
19        app:layout_constraintRight_toRightOf="parent"
20        android:layout_marginRight="16dp" />
21</android.support.constraint.ConstraintLayout>
app:Layout_ConstraintLeft_toLeftOf=Parent``-ConstraintLeft是视图左侧的锚点。ToLeftOf表示将该视图与分配的视图的左侧对齐,在本例中为父。
当在视图上设置绝对位置时,使用的XML属性是-
1tools:layout_editor_absoluteY="48dp"
2tools:layout_editor_absoluteX="40dp"
让我们添加另一个TextView并对齐它们的基线。 上面布局的xml代码是:
 1<?xml version="1.0" encoding="utf-8"?>
 2<android.support.constraint.ConstraintLayout
 3    xmlns:android="https://schemas.android.com/apk/res/android"
 4    xmlns:app="https://schemas.android.com/apk/res-auto"
 5    xmlns:tools="https://schemas.android.com/tools"
 6    android:layout_width="match_parent"
 7    android:layout_height="match_parent">
 8
 9    <TextView
10        android:text="TextView"
11        android:layout_width="wrap_content"
12        android:layout_height="wrap_content"
13        android:id="@+id/textView"
14        android:layout_marginStart="16dp"
15        app:layout_constraintLeft_toLeftOf="parent"
16        android:layout_marginLeft="16dp"
17        android:layout_marginEnd="16dp"
18        app:layout_constraintRight_toRightOf="parent"
19        android:layout_marginRight="16dp"
20        android:layout_marginTop="16dp"
21        app:layout_constraintTop_toTopOf="parent" />
22
23    <TextView
24        android:text="TextView"
25        android:layout_width="wrap_content"
26        android:layout_height="wrap_content"
27        android:id="@+id/textView2"
28        app:layout_constraintBaseline_toBaselineOf="@+id/textView"
29        android:layout_marginStart="16dp"
30        app:layout_constraintLeft_toLeftOf="parent"
31        android:layout_marginLeft="16dp"
32        app:layout_constraintRight_toLeftOf="@+id/textView"
33        android:layout_marginEnd="8dp"
34        android:layout_marginRight="8dp" />
35
36</android.support.constraint.ConstraintLayout>
还有另外两个用于自动创建约束的工具自动连接和推断。
- 自动连接 -可通过点击
 顾名思义,自动连接会在两个相邻视图之间自动创建约束
 - 推断 -点击
 推理引擎在布局中的所有元素之间创建约束。推理引擎试图根据各种因素(如小部件的位置及其大小)找到并创建最佳连接。
下面是一个自动连接布局的演示: 正如你在上面的gif中看到的,约束是自动生成动画的。请注意属性窗格中的水平和垂直滑块。它们分别称为水平偏向和垂直偏向。它们允许我们使用偏移值沿水平轴或垂直轴定位视图,这将相对于其受约束的位置。上述演示的XML代码如下所示:
 1<?xml version="1.0" encoding="utf-8"?>
 2<android.support.constraint.ConstraintLayout
 3    xmlns:android="https://schemas.android.com/apk/res/android"
 4    xmlns:app="https://schemas.android.com/apk/res-auto"
 5    xmlns:tools="https://schemas.android.com/tools"
 6    android:layout_width="match_parent"
 7    android:layout_height="match_parent">
 8
 9    <ImageView
10        android:layout_width="wrap_content"
11        android:layout_height="wrap_content"
12        app:srcCompat="@mipmap/ic_launcher"
13        android:id="@+id/imageView7"
14        app:layout_constraintBottom_toBottomOf="parent"
15        app:layout_constraintRight_toRightOf="parent"
16        app:layout_constraintLeft_toLeftOf="parent"
17        app:layout_constraintTop_toTopOf="parent"
18        app:layout_constraintVertical_bias="0.58000004"
19        app:layout_constraintHorizontal_bias="0.47" />
20</android.support.constraint.ConstraintLayout>
启用推理的布局演示如下: 上述gif的xml代码为:
 1<?xml version="1.0" encoding="utf-8"?>
 2<android.support.constraint.ConstraintLayout
 3    xmlns:android="https://schemas.android.com/apk/res/android"
 4    xmlns:app="https://schemas.android.com/apk/res-auto"
 5    xmlns:tools="https://schemas.android.com/tools"
 6    android:layout_width="match_parent"
 7    android:layout_height="match_parent">
 8
 9    <TextView
10        android:text="TextView"
11        android:layout_width="wrap_content"
12        android:layout_height="wrap_content"
13        android:id="@+id/textView22"
14        tools:layout_constraintRight_creator="1"
15        tools:layout_constraintBottom_creator="1"
16        app:layout_constraintBottom_toTopOf="@+id/button2"
17        app:layout_constraintRight_toRightOf="parent"
18        tools:layout_constraintLeft_creator="1"
19        android:layout_marginBottom="59dp"
20        app:layout_constraintLeft_toLeftOf="parent" />
21
22    <Button
23        android:text="Button"
24        android:layout_width="wrap_content"
25        android:layout_height="wrap_content"
26        android:id="@+id/button2"
27        tools:layout_constraintTop_creator="1"
28        tools:layout_constraintRight_creator="1"
29        android:layout_marginEnd="31dp"
30        app:layout_constraintRight_toRightOf="@+id/textView22"
31        android:layout_marginTop="178dp"
32        app:layout_constraintTop_toTopOf="parent"
33        android:layout_marginRight="31dp" />
34</android.support.constraint.ConstraintLayout>
Tools:Layout_ConstraintTop_Creator=1``:用于跟踪谁创建约束的创建者属性,特别是如果它们是由分配为1的推理引擎创建的。
删除约束
要删除单个约束,请将鼠标悬停在圆形操纵柄上,然后单击它使其变为红色。要删除视图的所有约束,请执行以下操作:点击其下方的符号,如下所示: 示例演示GIF:
 这将结束本教程。您可以继续尝试使用约束布局替换您自己的一些布局。